Lessons
Lesson Info
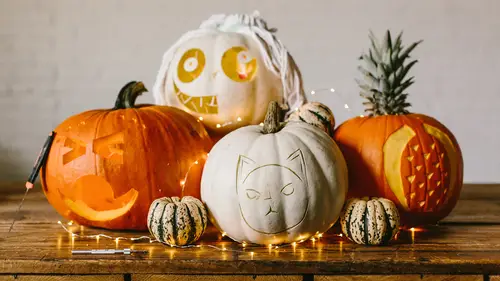
Surface Carving
So I've transferred our template, used some of our basic carving tools and put them in here, but then we have surface carving. And surface carving is going through and just removing different portions of the surface so that you can get different depths and different qualities of what's going on with the pumpkin. So I'm gonna use this white pumpkin that we have over here. I'm just gonna move this over there, gonna grab this one. Yeah, that way we can see the surface as we go. This one has a nice flat spot on the back here, which will make it good. Now we could go in and we could draw anything that we want to on the surface, and one of the ones that we have here is this one that has some writing on it. And so I can put this on, and I can do some surface carving here. This is gonna take a little bit of time, so I'm just gonna do one of the words here, so you see. And you don't have to go and run the entire length of the letters here, you can just very quickly go through and just do sectio...
ns of it, so that you know where this is gonna meet. So we can save a little bit of time. Now, anything that you can print out online, you can do type, you can do people's faces, you can do pictures, whatever it is. As long as you can print it out, you can transfer it to a pumpkin this way. And then work on your shapes one by one. And you can see that I'm just going around part of this, just to form kind of the lines, the letters, so I get an idea of where this is going to be. And, little bit hard to see, but now you can see that right on the surface there. Then I'm gonna use some of my carving tools. Now, the loop is really great for going in and taking out nice areas. You can control the depth of this really well by going through and pulling at an angle. And you got your little scoops as well, to go ahead and dig stuff out. This is another great one too, with just a little rounded end. Which I'm gonna use partly because my letters here are going to be a little bit narrow. So I can just start, and I can just do a little bit of surface, right there. Come to the end, just kinda chop that off right there. And you can see that I'm not matching the letters perfectly, but I get the sense, or you get the sense, of how that's going to work. And I like the rounded ones here cause they seem to work really nice. We can go right through. See where I've done that? It's a little bit hard to see on the pumpkin as you go through. Yep, I guess we're gonna go right around here. Carve that, little bits and pieces. Don't do too much and get too aggressive, 'cause these are fairly sharp, and you don't wanna slip and run that into your hand. So you can always go back and take out a little bit more, just a little bit at a time, right there. Just follow my template, keep referring back to my original template, it's a little bit hard to see this. This would probably be a good idea that you go in and then take your marker and kinda go over your areas at first, so that you can see how that's going to work. Or get a little bit better guide right there. Once you get used to doing this, you'll know how much pressure to put on here when you're actually doing and transferring the pattern here. Yep, go around. There we go. Then do the E. Can't forget the apostrophe, 'cause even if you're pumpkin carving, you gotta have correct grammar. Absolutely, yes, definitely. So, this is going in and doing surface carving. Now if you wanna do other techniques too, you can go through and you can take out as much or as little as you want. And also, keep in mind that when you're scraping out the pumpkin too, after you do this, you can go in and begin to scrape out the back of the pumpkin more here so that more of the light's gonna show through, through the surface here. One of the other things I like is this little angled one, this little V, where you can go in and you can carve just this great little fine piece all the way through, which graves great detail in whatever it is that you're doing, so you can have a lot of fun with this. If you wanna do very intricate carvings, or interesting pictures, or themes, this works really good as well. And there's different depths of this little V shape, but you can see what that will give you on the pumpkin. If you wanna use your loop, your loop is gonna be one for a little bit more aggressive removal of material. And with this, you just go ahead and you push down a little bit, and you get into the pumpkin right here. And then you can go through and you can take out a large amount of this, and then you can control the depth fairly easy. Takes a little bit of control, because the pumpkins are a little bit stiff, but you can nicely go through and take out a lot of this. And this is great for carving, because you can use both the sides and the bottom for the depth. And you can go a lot deeper, too. Don't try to do all the depth at once, so you can begin to get different depths in there to create different looks and feels of what it is that you're doing. Now, we'll show you another cool method of doing this, and I'm just gonna flip the pumpkin over to the side here, and we're gonna do something a little bit different with this. In fact, we can do it on the back 'cause it's nice and flat. Then I'm going to jump back to my drill here. We're gonna use one of the smaller drills, and show you how it can combine actually cutting holes in the pumpkins with surface carving as well. Gonna take that. Take that out of there, and we're gonna do the drill, and we're gonna put some holes in here. (drill whirring) There's one. And these carving tools are really good for getting this stuff out of the hole saws too, 'cause these are little bit tricky. They jam themselves in there pretty good. And this one's gonna stick a little bit more than I want to, so I'll have to take it apart. Getting the little pumpkin pieces out. Let's get that latch back in there. And then come over here, (drill whirring) and take that out. Now, we've gone ahead and cut holes in here, and if you use a more aggressive edge right here, one of the things I can do is come in here, little bit too much, and I can begin to create some type of kind of beveled surface in here all the way around my pumpkin for whatever holes that I carve. So, I can use a combination of surface carving and carving holes as well. Put that in there. This takes a little bit of time, but, in the end you could have a cool look with both surface carving and cutting holes in it too. And I saw this online and I just thought it was absolutely amazing, and this is one of the ways that you can go in and create a really cool owl look by spending some time here, taking away the surface, and actually creating a nice crater going into the eye and creating the inset eyes of an owl here by going in and using these tools to do that. Takes a little bit more time, but you could imagine if we really went in at a steep angle and came out really far, how that could create a nice inset look to our pumpkin. And of course as this gets thinner, this is also gonna light up and be lighter on the inside here and darker on the outside as we go through and take away more of the wall of the pumpkin. But that could work as well. Add any type of detail, you wanna do hair? Hair could be a lot of fun, where you just go in and you actually leave portions of the pumpkin attached here, where you'd actually go in and, very carefully, not too deep here, go in and do a little bit of, just doing it a way that's gonna work a whole lot easier. This pumpkin seems to be a little bit softer, so I'm taking out a lot more on there. Just go ahead and do some hair if you want. A lot of times people will go ahead and just put a towel in their lap, and then just kind of cradle the pumpkin. Makes it fairly easy, 'cause I'm trying to hold it up and keep it in one position here for the camera. But, have a little bit of fun with the hair. Go in, create it. And this creates a nice little surface right there. So, several different techniques we can use. We can go in and just do surface carving and do the various depths. You can go in, use your scooper tools, so these little scooper tools here are great if you wanna go in and carve more of the surface away. Can go in, just kind of very carefully, go in and scoop out more content as you go. Use your little loop, go in and create larger ones for all of your other shapes, rounded, V-point right there. We also have some of our little flat ones, that can also be used for cutting. So if you wanna cut out little fine sections, you can go through and create nice little detail as well. Just a nice little, kinda like a flat X-Acto, that just takes out pieces as well. So if you ever wanna do a scene or something, these are definitely the tools to have, 'cause you got scrapers, you've got scoops, you've got little knives, and you can work your way through with really fine detail on those pieces. So, those are just some different techniques that you can use, the different tools. Cutting holes, using surface carving, creating interesting techniques, trying things. And then of course going inside the pumpkin and scraping out to make the wall a whole lot thinner, 'cause when you light it, that's gonna go ahead and show up if you scrape a lot of the wall away too, and then this lights up with different intensities, pretty cool.
Class Materials
Bonus Materials with Free Purchase
Ratings and Reviews
Fran
Glad that I saw this, now! I love pumpkins!! Looking forward to the season You show a lot of great, and super creative techniques that I can't wait to try. Thank-you!
Claudia Ortega-Lukas
This video had some really good and cool ideas/techniques, however, you should do a zoom into the tools when you show them. I'd like to see close up the shape of each tool you demonstrated. Otherwise, it was fun!
Rhonda Chapin
I learned some great hacks and tricks. Going to carve my pumpkin this year with more enthusiasm! BTW something I thought might be helpful is to push pins to hold stencil designs on pumpkin since tape doesn't work.
Student Work
Related Classes
Holiday & Party Crafts