Creative Processing With Light
Lesson 2 from: Creative Post-Processing for PortraitureJackie Jean Acosta
Creative Processing With Light
Lesson 2 from: Creative Post-Processing for PortraitureJackie Jean Acosta
Lessons
Lesson Info
Creative Processing With Light
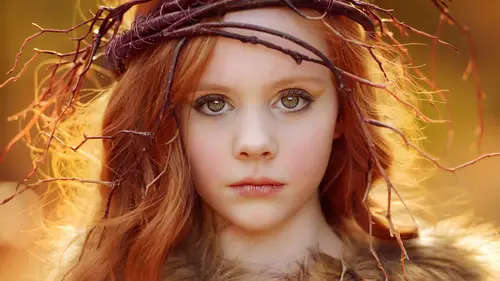
Alright, so we're going over the light and the shadows and changing the moods. This is straight out of the camera, I'm using all straight out of the camera images, so I'm not messing with the lighting, so you're gonna kinda see the start of that. Alright, so I got my Photoshop on. I gotta change the tools around just a little bit. So bear with me, okay. Again, this is straight out of the camera. Now, when you're adding depth and you're adding mood and light in images, you wanna start out with an image that already has that. If you're gonna start out with an image that's just flat lit and there's no shadows, there's no depth in that already, it's really gonna be hard to create more of a mood. You wanna start out with good shadows, you wanna start out with good light. All I'm doing is I'm taking an image and I'm enhancing everything. So I'm not, I will be, later on, adding on a few little tweaks here and there that weren't there, but again, if there is light, you can always amplify that ...
light, if there are shadows, you can always amplify those shadows. Alright, so the first thing: I'm gonna duplicate the layer, so if you are proficient in Creative Cloud or in Photoshop Elements, you can do this little trick for either one. I'm gonna go to my blend mode. So I duplicated the layer, I'm gonna go to my blend mode and select multiply. Multiply just adds a nice amount of richness to an image. What it does too is it brings out, kind of deepens those colors and I feel like it has a little bit of contrast too, also, which I really like. I just added a mask to it, so I'm not messing with the actual image and I'm just mask off some of the effect that I just did with the multiply tool and I'm not just gonna mask straight on. I kind of like photo editing as painting, so I'm kinda painting the light back onto her. As you can see there, I'm kinda leaving some of shadows in place and by leaving some of those shadows too, you're creating more of like a 3D effect, like where you can reach in that image. I really like that. You can do that with a dodge and burn tool too. I'm gonna go ahead and zoom in there and we're just gonna paint a little bit more, kinda highlight her cheeks. Again, highlighting the spots where there is light already. Got under her nose right there and I'll show you a before and after. This is just kind of a simple fix, just using the multiply blend tool right there. This is before and after. You guys see the difference there? It kind of changes the mood a little bit, ya know? Again, just kinda painting on the light back, so I'm just using that mask tool and the paintbrush. I'm gonna move onto another image. Show you real quick, this cutie right here. Alright, it's moody, it looks good. He's got some shadows, nice lighting. We're gonna do it a different way this time. We could do the multiply. We're gonna go ahead and add new layer, new adjustment layer and curves. I absolutely love curves, so I use this quite often. With curves, with this middle point right here, this is gonna control all the midtones. If you go up, it's gonna bring it up, if you go down, it's gonna bring it down. You go up here, this the highlights. Go down here, this is gonna control the shadows. Alright, so I'm gonna take this middle point down, cuz right now I'm really just lowering that exposure. And I'm gonna add just a tiny bit of contrast by creating another point near the shadows. Again, like I did with the last one, just kinda painting in that light. I'm gonna make sure his eyes are well lit. Lighting up the light there. I'm trying not to sing while I do this; sometimes I sing while I'm editing. Alright, and I'm actually trying to Painting in a little bit of stream of light, where the light's already coming from, creating that little stream there. Before and after right there, you guys see the difference? Alright, so that's a quick fix. Now, those are both two moody images, so I just made them moodier. (laughs) You can do that with smiling too. You got this one, we'll go back to doing the same thing we did before and multiply, bring that down, mask it, and bam! I am really drawn to rich images, so you're gonna see a lot of that in these pictures. Alright, so we got this next shot right here. I think this is a great shot as far as I mean, we got a really good connection right here, good light, again, I look at it and I'm like, Ugh, there's just so much more! You know? I love adding things. We're gonna do kinda what we did before, but I'm gonna use the curves layer, so we're gonna do another adjustment layer of curves and we're gonna bring that level down, add some contrast and I know that a lot of people like that whole matte, kind of vintage film effect, if you wanted to add that in there, I'm gonna grab this little, very small bottom tip right here and just bring that up. Again, that bottom part of the curves, that's adjusting all the shadows, so you can mess with the shadows there, you can make them darker or lighter. Raising that little point up, it adds just a slight haze, a slight matte effect to it. Alright, I'm going to mask it in and by masking it, I am just painting on and if you're not familiar with masking, I'm just gonna let you know that: What the curves that the adjustment layer does, so we've got this mask on it, you can see it, so the white right there shows that it's visible. Now, what we're doing is we're hiding the effect by masking it back in, so I got my foreground color set to black and I'm just hiding that effect of the curves on that one section right there. We've got that stream of light coming in, I don't want it to be too--you can kinda see that halo where it's really too pronounced. You wanna make sure that everything kinda blends in really good. I'm gonna lower that opacity to about 50 percent. Alright, so now, I'm gonna add just a little bit of light. So I go to my background, and I am gonna show you guys how to do this, I'm using an action real quick just to add that light in there. I will show you guys pretty soon on how we're gonna add that light. Alright, so I'm gonna kinda add a little bit more light on this, mask it in. I just wanna go for complete dramatic here. We've got 75 percent and I want to warm it up, make sure that if you are adding light, you wanna make sure that the temperature of the light and the temperature of the image match. I'm gonna go to a color balance layer and add some red and yellow. If you're warming up an image, you wanna make sure that in the midtones, you're bringing that red and the yellow, and pairing them together, so you don't want to do one or the other, you bring them together; it balances it out. Just like if you were gonna do the opposite effect and you wanted to cool off an image, you're gonna add cyan and blue together. Alright, I'm gonna bring in that red, bring in that yellow. Maybe mask off a tiny bit on his skin and we'll do, enhance that curve just a little bit more. And we've got a before and after. Am I going too fast to? I don't want to be going to fast for you guys. (laughs) Alright. If I start talking too fast, yell at me. Go, "Slow down!" Alright, so before and after, you guys see the difference there? I'm like, I don't know about you, I love golden hour and if I see it, living up in the Northwest, which you guys might know, it rains so much and so I have to create light to feel like I'm like, "Oh, sunshine."
Class Materials
Bonus Materials with Purchase
Ratings and Reviews
user-55fbc2
This class was amazing. I loved it. I just thought she went a bit fast and sometimes didn’t say where she found the room she was using. If you have distractions around you like kids, this is something you will want to watch more than once. Or maybe clear the distractions before watching. I feel I learned a lot and it will help me bring my picture editing to the next level.
user-c52dd6
This was an excellent class. I really wanted some simple photoshop techniques to add to my portrait work and this was perfect. I learned more about masking, layers, creating extra light and balancing my images. Jackie has a great simple lesson on composite photography at the end for a beginner. If you are looking for easy and immediately applicable upgrades to your portraiture work, this is it.
Dre' Black
Shocking I'm impressed with her simple yet effective techniques. It almost makes me wonder how I didn't know all this single how simple it is, but she does a great job at teaching it and wrapping it up in a nice package.