Tool 3: Gradient Maps for Color Work
Lesson 5 from: Creative Application of Color Through Post ProcessingPratik Naik
Tool 3: Gradient Maps for Color Work
Lesson 5 from: Creative Application of Color Through Post ProcessingPratik Naik
Lessons
Lesson Info
Tool 3: Gradient Maps for Color Work
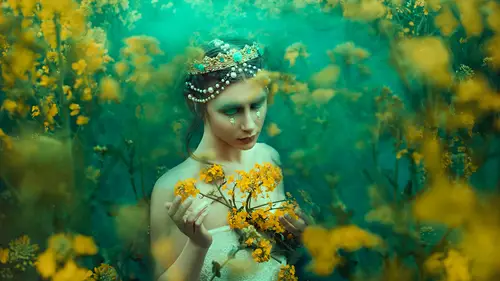
the next image I'll talk about along with my leg. Next lesson is going to be Chris. He has a beautiful portrait, and he used this shot on his latest book as well. And I thought was really captivating. It's really beautiful. And I remember seeing this image in I was, uh, really engaged by it because sometimes as retouch is, what happens is we get really bogged down in looking at the details we get really focused on removing things that shouldn't necessarily be removed. Sometimes what I like about his control of things is, aside from the color itself, he leaves elements in the image that aid to the emotion. For example, when you look at her hair right, some photographers will say, Could you remove a few of those trance? Could you fix up the sweater a little bit? But the reality is you shouldn't really do that because it's adding to that emotion that you're going for. And when you think about colors, these little things also play a huge role into how you process your colors for the image ...
because you're leaving these details in, and it lends to some of these little things when you remove some of these things, the moment of the image changes. If I had taken that out, it would look a lot more calmer, right. There wouldn't be a lot more energy. So there's things to consider aside from color that really do tie into it. If you believe it or not, let's go ahead and bring this over and pump it into foot a shop. Now let's say, for example, I want to use another method to color to an image. And I'm just using these examples because you know what they're fun to look at. And they have a great range of highlights, shadows and mid tones. So it makes a perfect example of being able to do this. I won't talk about greedy and maps. How many of you used them and you worked for What do you use them for? I've just kind of played around with them to give the use. IPad, for them is like really colorful images like more Rainbow. We tight, uh, work that I've done my kind of graphic design stuff, so that's I haven't done it like in realistic portraiture, So I'm kind of interested in doing it more That's also so even in graphic design, you find use for using great amounts as well. Yeah, in graphic design. Sometimes I do some light retouching because I need the photo to match what we're doing. Sure. So? So you're able to lend the specific palette in order to match right? So I'll take our branding palette and apply it to the image so that it blends in with the whatever we're doing. Perfect. Yeah, that's actually a good point because you know what we're talking about today, and a lot of it deals with matching things right. We've talked about pallets and how to sample swatches, but when you talk about, um, matching color tones, some people prefer one tool over the other. So, yes, these things all do very similar things. But to be honest, because they do a lot of similar things, it's also based on how familiar you are with the tool that makes you want to use them. It's kind of like going to the gym, right, because I go the gym all the time. But really, when you think about going the gym, you will go. If you like going to the gym, you probably won't go as often if you hate doing it. So if you see a technique that you like, no matter how good it is, sometimes you don't use it because you don't like the process of doing it. And some people like using Grady maps and people don't some people like using blend if options. Some people like using blending modes, so it just really depends. But they all do the same thing. So, if you're wondering, is one tool better than the other dancers? No, it's specifically preference. I Sometimes we'll switch him up just based on what I'm feeling things to consider. So for those of you don't know, a great it Maps is Grady, and Maps is another adjustment layer, so we'll go into photo shop again. Ingredient maps have been there for a long time. A big mistake people do is a site from using Grady Maps will end up going to Grady int. Do not go to greedy int okay, because you will not have the same options that Grady members grading itself just applies a grading across the image and, yes, also very cool. I should say accident, but that's not we're going For Grady, it is like a baby version ingredient map. What greedy in does is, as you see, with these little presets, it just applies ingredient. And since we're on the topic, you know, I'm just gonna go and talk about it. You can then change the opacity. You can change the blend modes. You can do all kinds of things, but this is more of a overly. This is not into it. It's not smart. It's not calculating zones, if you will. So we'll go into agreement maps because that's what we're here to talk about. So we have ingredient mouth feature here. The first thing to note. I'm gonna go this really slowly because everybody gets lost for no reason when they see the state of mind's explode there, like I don't get this is confusing already. It's not really that confusing. When you load that grading map, it's going to load a predetermined set of colors, which changes from person to person. Whatever colors have loaded previously years won't look the same. It's mine right now, so don't forget you're not lost yet. Okay, However, we need to actually start in putting our colors. Okay, so this is what's gonna happen over here under property. That's his great map. And you'll see this bar, right? What we want to do is click on that bar. No, here, just like that. Blend if modes you see the hissed a gram from left to right On the right hand side, you see this brighter orange color that relates to the highlights in the midterms. On the left, you see the shadows, so whatever colors in these regions relates to whatever color is across the image. Okay, now, how do you go about adjusting these colors? How do you use these colors? Let's go and pull apart swatches as well. Okay, let's go pull apart swatches. Now let's go back to adobe Color. See here. So we have adobe color. Let's go ahead and create another pallet. I always recommend looking at movies, because when you look at your favorite movie, you might realize that it shares a really colon palette that you've been drawn to subconsciously. When you source those colors, it makes it really easy reference in order for you to apply them as well. No, I'm going to simply go ahead and use a complementary color set so I'll do the standard color said that you see across Ah, lot of movie posters. Right? You see this like teal orange burnt amber kind of spectrum. If you are logged in to your creative cloud account and you log in over here and always website, you can hit save, and you can say you could name it and then hits safe. What happens is it saves that color pellet into the theme. You can save different themes. So if you decide that you actually like a sonic palette enough to save it, you can What? That also does to make it easier for yourself is under window and libraries. Guess what happens. It pops up technology, huh? Awesome. So the color path theme itself pops up, which is awesome, because now, if I come over here and select ingredient map, I want to make sure that the layers selected over here and not the mask suffice like the layer itself. I'm gonna click on the actual graded editor. I can then decide. You know what I don't want? Um, this culture, my highlight, actually wanted change it. I'll just select it and come on over. Let's see here I'll select the color down here, and she's not referencing it, but normally it does. But let's say we pick a color similar to it. I say we pick a side ankle here, right? And what that allows us to do is give this opportunity to use specific tones that are complementary to each other and applied directly. Now, the way to actually apply this to the image itself is will hit, okay, will come down to color, and then we can reduce our passage e so you can start by going to zero and bring it up. And what happens is allows you to cross process the image just based on knowing what color samples you want to use. The other benefit of grading maps is over here at the bottom. You can add other points so you can see you know what? I don't want that point. I don't the mid tones to be whatever it decided should be, and I can override it and pick a different color that I want. So let's say that we want to keep it in the same family like this golden color she can see goes from this science color here it goes to this like light, golden color. All the way to is like burnt amber color. And just like that, you're allowed to keep a great of your choosing. You could even save them and say them to everyone. It's safe. Okay, you can also load them. So if you have a specific palette that you were trying to save but you you want to load them again from another computer, you can save your palate range and do that as well. And I should say it's actually going to be new, not safe, cause save will do the whole spectrum. Whatever you have there, just hitting you and then hit safe. Okay, Once I hit OK, and I go back there, you'll see that because I accidentally loaded Maura greedy INTs. They popped up, but it actually loaded the one that I also had their previously. So they're not gonna go anywhere. And then when you want to transfer which other computer, then you can hit, save, and then move them over. The other benefit is that we can use blending modes with them as well. So let's talk about blending modes really quick. I'm not gonna talk about all of them. But I want to talk about a few of them because blending modes a really powerful when you want to create in effect and you want to add localised effects to the image because we've talked about total ranges. We've talked about how to apply colors in different areas. But now let's talk about how we team take full manual control and apply them specifically as an effect.
Ratings and Reviews
Amy Vaughn
Pratik gave a nice range of tips for ways to color images creatively. I especially liked that he went over a workflow with Photoshop and CaptureOne, since that's my workflow too and it's sometimes harder to find those classes. His tips for adjusting skin tones were especially useful and something I'm always thinking about now when I edit photos of people. I also appreciated the way he explained the differences between hue and color, and I even learned a couple of new tricks with blend modes. His teaching style was engaging and I'd love to see more classes from him.
a Creativelive Student
basic info but nice artist, enjoyed the work flow