The Essential Product Photography Props
Lesson 20 from: Craft Photography FundamentalsCandice Stringham
The Essential Product Photography Props
Lesson 20 from: Craft Photography FundamentalsCandice Stringham
Lessons
Session 1
1Introduction to Craft Photography Fundamentals
04:59 2What Your Visuals Say About Your Brand
04:56 3How to Become a Photographic Author
10:44 4How to Use Natural Light for Your Product Photography
10:00 5Setting Up Your Photo: The Basic Rules
09:07 6Becoming the Viewer to Take Better Photos
10:30 7Shooting 3 Setups: Creating the Backstory with Images
34:32Shooting from Top Down with an iPhone
19:49 9Shooting Paper Products with an iPhone
10:54 10Shooting Jewelry with an iPhone
19:01 11Editing on your iPhone
15:28 12Finding Your Brand's Aesthetic
18:39 13Find Your Product and Customer Target: Exercises
11:12 14Figuring Out Your Audience
08:46 15Interview with Gilit Cooper of The Bannerie
08:45 16Branding Beyond Instagram
19:47 17Looking for Natural Light in Your Home
19:36 18Building a Styling Prop Collection
08:22 19Creative Backdrops
13:52 20The Essential Product Photography Props
11:18 21DSLR Basics
02:39 22Understanding Shutter Priority And When To Use It
26:29 23Understanding Aperture Priority And When to Use It
37:16 24The Basics of White Balance
12:52 25Photographing Jewelry
37:27 26Setting Up a Bedroom Set and Photographing Pillows
19:59 27Photographing Greeting Cards
06:53 28Shooting Products on a White Background
17:24 29Top Down Photography on a White Background
13:06 30Shooting Products on a Black Background
07:23 31Shooting Reflective Items
12:20 32Shooting with Backlight
04:01 33Top Down Photography: Shine & Reflection
24:50 34Basic Editing in Lightroom
31:37 35Batch Editing in Lightroom
06:00 36Editing Jewelry in Lightroom
10:01 37Editing White on White in Lightroom
06:54 38Editing Shine and Reflection in Lightroom
17:03Session 2
Lesson Info
The Essential Product Photography Props
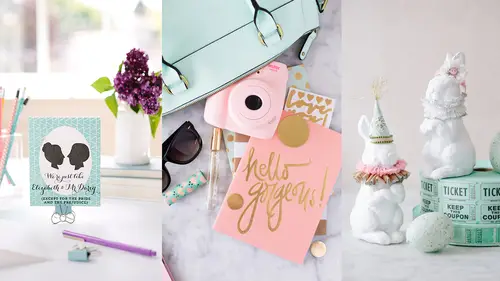
And then as far as propping goes, I'm just always looking for the colors. I always have that in mind of what I want to get, what pieces do I have in the future that I want to market and what the season is, and I just kinda keep that. And I actually keep a list with me in my purse, so that when I'm out shopping, I try and limit myself to only buying things on that list. Otherwise, it gets really easy to be like, but I love it, and I'll make it work, right? And, it's a business expense. So, I try to be really careful to stay on task and on brand all the time. When I want little props for top downs, one of my favorite sources is the doll house section of the craft stores. So, like these little bunnies we are gonna use with an Alice in Wonderland print, and they just work perfectly, but it's a section of the store you wouldn't even think to go in or to look in. But, they have really great little props when you're doing little tiny sets. Like, if you were photographing cards, and you want s...
omething that's sort of in proportion so the card is the biggest thing, it's a fun place to look. Paper clips, little dishes, thing I always invest in. And then, again, the frogs. So these are my very, very best friends when I am alone at home shooting and I need to hold up a fake wall, even when it's wrapped in fabric, I can still push it right down in there and these guys will hold it in place, and then they also work as stands. I've also used cards, and them to hold them, so they're really, really handy, and just a worthwhile investment. You can also find them on Amazon if you don't even wanna leave your house, you can order them. Okay, the other thing that I like to do is keep things in sets at home. So that I know if, today, I'm styling a desk set, and I want it to have a vintage feel, I have everything together that I need to do that. So, I had some vintage journals and some cool pens, and a little dish with paper clips. And, it's just easy for me to grab and go wherever I need to go, whatever window works, and shoot it that way. And then, just extra items. So, for me, for party, this isn't a party item, but it makes sense that people are gonna be taking photos at a party, and we love pink, so I invested in a pink Instax. I have never even used except for styling photos, so think of things like that, so think of what you're selling. And then, what would people be using at the same time as your item, and then surround your item with those types of objects, and you'll be able to use them over and over again. So, every time I do a party set, if I threw this camera in, it makes sense, just because people love taking pictures at parties. Alright, do we have any questions? Yes. I'm just wondering, the small props made me think of it, when you use your DSLR, do you use different lenses? I was wondering if I need to invest in a macro lens to try to get really close up, or those kind of things. Yeah, so your photograph jewelry, so I would recommend a macro lens, Okay. and we'll definitely talk about that tomorrow. But, I actually shoot a great majority of my product shots with a macro lens, even though I'm not getting super tight. I just love the focal quality of it, so we'll talk about that tomorrow. Okay, good. Yeah, good question. Anyone else in the studio? Alright, well we have some questions online, or some suggestions of what people are using. We've got snowfall1127 who says, "I also use Christmas wrapping paper as a background for a Christmas mug that I was photographing. Question from Sophia A., is, "Any thoughts for photographers "to add some special setups and props ideas "to balance out the imageS on Instagram." So, I guess, is there a need to do something different, what you're doing on Instagram, versus maybe in your product shots for your Etsy shop, or what have you. I don't think so. I think of Instagram as a supporter to our actual blog and our product photos. And so, I will put our product photos into Instagram, but then I also do more lifestyle aspect in Instagram. It's a little bit more fun, it's a little bit more loose, and it's letting people sort of see into. . . a more relaxed side of our company, then a very posed side. And so, my props work across all of our platforms. So, definitely if I'm gonna invest in something, I want it to work everywhere. I like to do things as inexpensively as possible, but I want to make them look as expensive as possible. And actually, I'm glad this came up because I was talking to a really good friend who is a really big blogger. Does very well blogging, that's her entire living. And, she started the blog like ten years ago, when she was just young, college-aged and had no money right? And so, everything in her styling was the cheapest things she could find, and it was usually WalMart or Target. And, I will put this out there, if you're using WalMart or Target, and it's not a basic item, people are going to know, they know. At least my customer knows 'cause they're like me, they go to Target and walk around (chuckles) for an hour or two in the afternoon. And so, what she was saying is the hard part as they have grown as a business, and made more and more money and they're able to spend more and more money, their audience doesn't want that from them. Because they started out with an inexpensive audience, who wanted the cheapest DIY's possible, now that they can do higher-end DIY's, there's this disconnect and it's really hard, 'cause they feel stuck here, and they can't get here. So, she actually recommended to me when we started Handmade Mood, is to high-low, right? Invest in a few key pieces that are expensive, and that look expensive, that are expensive, but those are your key pieces that you your know gonna use over and over again, and you really invest in that. And then, get the basics, that are not really recognizable in an inexpensive way, right? And so, that high-low mix is really important as you grow as a business so that your audience can grow with you, and they're not stuck in one place or another. That's just a little personal tip, and that probably is more for bloggers than for businesses, but if you're a blogger and you're watching this, there you go. (chuckles) Hopefully that will help you save you some pains in the future. But yeah, even though all this stuff is handmade, I never want it to look handmade, I want it to look expensive, right? I'm okay with my product looking handmade, if it's handmade, but I don't wanna surround it by craftiness, because I want it to be the craft. And I want my craft to be perfect, so I want everything else around it look that way, too. So, yes, I'm hacking a lot, but I feel like my images never show that, you would never know where I am or what I was using, and that's important to me. Yeah, it's very important, but you're showing us exactly how easy it is to do it when you know what to do. I have some more good questions for you. Okay. This one is related to what you're talking about. "How do you know when your staging is done? "I have a tendency to put in too much in an attempt for it to look lush and expensive for my targeted customer." Okay, if it starts to become visually cluttered, that is a problem, right? And I think it comes back to what we were talking about this morning. If you start to notice that the items around your supporting characters are now becoming main characters, then that's a problem, and you need to start pulling. Because, everything in your image should be telling the person where to look and it should all point to the main character. And if it doesn't, then you have too much going on, and that's how you know it's time to pull away. And again, just like this morning, sometimes I have to take the photo first, and really look at it to know. 'Cause at the time when you're involved in the process, and you guys know this as creators, when you're making something for the first time, you're kind of like, is this good or not? I don't know if it's there yet. But maybe it is? Maybe if I add one more thing, it's not gonna be good, you know? So, you kind of have to step away from it and then come back to be able to really see. At least for me, that's how it is. That's great advice. Anyone else in here? Alright, so this is a question that came in earlier from MAO Photo. You're talking about the different setups that you do, and the backstories and creating that for the product shots. If you have more than one audience for a product that you sell on a venue like Etsy, do you create multiple listings of the same item to appeal to that person and make a connection with that person? That's tricky, because I would almost do what we talked about with Instagram, where you kind of keep it separate. Because, it gets visually muddled when you have multiple styles in one store. And, for me, if I go to somewhere and I'm looking at thumbnails on the page, which is what we all see first when we go to an online store, and I can't tell what they're selling, or who they're selling it to, then I generally won't even click on it. I'm gonna move onto the next seller. And so, I do think that you're going to do better by picking a brand and going with that, even if you feel like it's limiting you in the beginning, it actually widens your opportunity because you have a strong visual appeal. So, I would almost do two separate shops, if that's the case, instead of mixing them, one's on dark, one's on light, one is vintage, one is modern, it's hard. That's hard to tell what they're trying to tell you.
Class Materials
Bonus Materials with Purchase
Ratings and Reviews
a Creativelive Student
This class taught by Candice was amazing. She teaches in such a step-by-step, easy to understand pace. She shares so much of her own tips and tricks she uses to create beautiful images without spending a fortune or having all kinds of expensive equipment. Having the DSLR lessons included was really great for anyone who wants to do more than the camera phones are capable of. Learning the basics of how to use a DSLR is confusing for most people, but Candice broke it down in the simplest way possible. Social media is all about imagery, so if you want to put out the most beautiful eye-catching photos, then you want to learn how to use more than the camera phone. I don't have a business where I need to take photos of things I sell and I still enjoyed her class so much. As a photographer, I am going to use her ideas and insight when I photograph things for fun. There is so much to gain from this class. I would highly recommend taking her class. She is a wealth of great ideas and information and has that friendly personality of someone you'd want to sit and have coffee with.
yomichaela
A wonderful class to get you going with craft/product photography. Candice provides (and shows) fantastic examples and it's really fun to watch her work through a shoot, moving items, etc. to create the final image. She also covers some basic photography tips which is very helpful. Great class! I definitely recommend to others!
Melinda Malamoco
I loved this class! Candice is so personable, clear and relatable. I would want to hang out with her and be creative! I have been taking pictures for YEARS, and for my Etsy store for over two years, and I still learned a lot in her class. The lessons are set up in a way that you can follow, take what you want and don't worry about what you don't need. I will say that I got a TON of ideas for how to better display my brand, what my personal style is and how to be consistent with it. I so recommend this class for anyone who has small business or just wants to be able to take better pictures of their products. Okay, off to build a prop kit!