Shoot: Dappled Light with and without Flash
Lesson 19 from: Conquering Crappy LightLindsay Adler, Erik Valind
Shoot: Dappled Light with and without Flash
Lesson 19 from: Conquering Crappy LightLindsay Adler, Erik Valind
Lesson Info
19. Shoot: Dappled Light with and without Flash
Lessons
Day 1
1Class Introduction
32:47 2Crappy Lighting Conditions: Direct Sunlight
27:47 3Crappy Lighting Conditions: Fluorescent and Mixed
21:00 4Crappy Lighting Conditions: Low Light
29:21 5Crappy Lighting: Dappled, Backlit, and Overcast
12:32 6Setting Your Camera Up for Crappy Light
27:43 7Shoot: Fixing Fluorescent Lighting
06:16Focusing and Shooting Modes
18:35 9Shoot: Mixing Daylight and Tungsten
23:16 10Getting Started with Flash
43:30 11Shoot: Low Light without Flash
19:43 12Shoot: Low Light with Flash
16:49 13Recap and Q&A
16:37 14Crappy Lighting Condition: Backlight
33:16 15Crappy Lighting Condition: Low Light Outdoors
24:10 16Shoot: Direct Sunlight
37:20 17Shoot: Direct Sunlight with Shade
05:47 18Shoot: Direct Sunlight with Flash and High Speed Sync
25:35 19Shoot: Dappled Light with and without Flash
28:57 20Shoot: Open and Covered Shade
11:29 21Shoot: Overcast without Flash
23:50 22Shoot: Overcast with Flash
30:04 23Recap of Shoot
1:40:16 24Scenario Kit: Event
27:44 25Scenario Kit: Wedding
20:56 26The Next Step Slideshow
24:52 27File Managment and DNGs
12:02 28Creating Color Profiles
27:56 29Noise Reduction in Lightroom
12:59 30Using a Color Checker
23:32 31Post Production: Basic Adjustments
25:19 32Post Production: Smart Objects and Color Processing
25:29Day 2
Day 3
Lesson Info
Shoot: Dappled Light with and without Flash
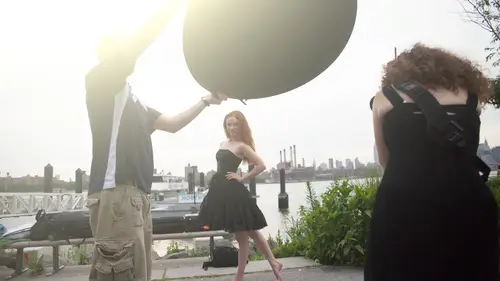
All right, dappled light you'll be able to see actually from over there and that's going to be a mixture of highlights and shadows. And so that would be the example we tried to recreate here if you can actually see the setup is you know how at ah wedding they might have the arch of the overhang with all the ivy, and what not over it's really beautiful in everyone's to be photographed there, except if it's sunny there's light and shadow in random places, and some might have highlights on their nose or highlights in the hair highlights on the brides dress and things like that. So it creates a very difficult situation to handle. And so that's what we have recreated here, but hanging the lattice, and then also mixed with the treats closest we could get. Um and so what you have to do is you have a variety of things to do. The first option is you, khun try toe fill in the shadow area a little bit to match the highlights. It usually doesn't work, because if somebody's under shadow and that th...
e sun is so bright, user creates a blown out highlight that you can't pump up the shadows enough to even out the exposure and usually when you do it creates such a contrast to picture it's not desirable, so I would say the next option that you have would be to block off the overhead light you can do it wanted two ways you could actually take a piece of foam core, maybe, or you could take, um, the black side of a reflector and hold over the person's head, so for when you do that, it doesn't look like they're the environment, but it looks like they're under complete shade and so that's not always ideal, and so thesis lucien that I prefer the best is to defuse it there's still that light on their hair and light in the background light and their clothing instead of being in shade. But it's, not so one, even when you've evened it out, the highlights aren't so bright, the showers aren't short dark, and eric has talked about the fact that with a contrast, the light or being in the sun, when you have that the transition from highlight to shadow is really, really sharp. But when you pop open a diffuser, it makes it much more of ah graduated change between highlight, just shadow, so you won't notice the bright highlights in the dark shadows as much in the dappled light. We're going to take a look over here, and then eric would take his approach where he would actually fill in with a little bit of flash, so I am going to have you stand over here and actually to be able to see his face it would be about all right there there is a little bit close this way perfect okay and I'm trying to get tangled on you and I'm sure you're gonna you're gonna face me this way this is where I see my dapple bio it's good and dappled okay perfect sick take a look at how this looks oh dear that's a good thing that your face alright so as you're looking at this fear extremely bright highlights extremely dark shadows um if you're being cool and fashion if you have the ability try to move somebody ask him to try to feel the light on their face okay? Normally that would be okay but maybe you can't hear it's it's that intense um so the next thing I do which one do you have for me got white silver and so the next thing I could try to dio would be to fill in a little bit it's an I give me a little bit of still on him all right through that so if you look the shadows air filled in a little bit and ideally what you do is just try to carefully place the shadows so right now he's gonna have shadows on his eyes and it's really only kind of filling in a bit so for me it's not going to really do much thinking up so let's have him back up a little bit this way soon catch the sunlight instead of feathering let's kind overpower seriously and can you hold up high to remember? I don't want to hold it down low you're gonna hold up high front angle and this is one of the situations where you don't want to blend in, but this is where you kind of have to like this is where the feathering isn't gonna do any good because the feathering is a much less intensity on the face and we actually have to overpower everything. So this is going to be a little break, okay? I'm ready, ok? The problem is you will see half these pictures, he is squinting and blinking so that's, this is what you can do it if maybe like I don't have you move over a little bit, try feel more shadow on your face like I'm looking, if you can see what I'm looking at right now, back up, it's a little bit right there, maybe maybe we'll try that I'm trying to eat more of his face and shadow. Yeah, that's better and can you do one drop it, eric also people would look like before, so what I was trying to do is at least get us there wasn't so much highlight, so I don't have to overpower um as much as the shadows fill in with the reflector so it's a little less offensive okay not ideal so let's go to the next solution could I have a diffuser and a black please all right, so the next solution I would take would be to defuse the overhead light um if you're photographing, we actually have say this trellis the lattice and you have the ivy overhead you don't want this to be in your shot, so if you could figure out how to get it up overhead, that would be ideal. All right, so this is a diffuser and what you'll see is because it made his face significantly darker that background behind him which I have of the brick and a little bit of this treason sunlight it's goingto look brighter and so your camera right now since I'm on temperature priority it's try to meet halfway and so his face looks dark situation that background romance light ideally would I would try to do is look for a darker background we don't really we could I mean the trees a little bit close, but probably not so I'm just telling you this really is a bad situation if I could I would look around and I would scan for sir something darker to put behind him I suppose should defuse one more time and I'm gonna bump up my exposure a little bit all right, that looks better it looks pretty good the problem is there for me he's more less lost catch lights in his eyes so could I have oh dear this is this is what I used to do well, I create something called a light trap and so what I'll do is I will have you diffuse and would you hold this right? So if you look at his face it looks it's the light looks gorgeous is what it is it's defused overhead but there's still light and because it allows the direction of light through it allows something to bounce into the white if I used silver which I'll show you in a second would be that bottom monster like let's take a look beautiful and let's switch to silver just for a second and show people okay oh yeah not ideal so this was this was the bad okay, silver don't do that the white is good and so if you don't have a man extra reflector maybe you had a five and one where you just had the diffuser and then you're like well that's that's all I had um I often will use a piece of white foam core underneath that's fine or if you had taken off um a diffuser and part of it was a soft silver exactly exactly exactly where I was going we've never discussed this he just knows so you can kind of just like this is gonna obviously just work for headshots perfect and so he is filling himself warming perfect perfect great. So that's would be my approach is saying okay let's see what I can do to soften the light it's soft but there's no catch lights in his eyes there's no contrast so let's add a little fill it would either be white right reflector or a silver white or even just the case that I took off the five in one um let me just do one we actually block off overhead completely and just show that so the other option is you absolutely do not want this overhead light it just happens to be the only shade that you have there. Okay? Well, you can just completely block it off so we're going to use the black side of the reflector. Um one of the reasons that you don't want to use the silver side down is sometimes it will cast a little bit of overhead like you don't want, especially if you're standing in a bright area like this so we have black good can you turn your head that way? So we'll talk about this and a little bit but there's actually a direction of light in this and it happens to be from over here because there's something reflecting so I just have him turning toward that direction of light and if you look, he has no light on his face from overhead and that's why? I don't prefer as much if you have no other choice at least you've gotten rid of this dappled light do you think that pretty much covers the natural light partial portion of it? Yeah, one looks your other foot first photos where you have the light coming through if we could get one of the cameras to kind of shoot up into the diffusion material. Lizzie kind of touched on it here, but look up into the diffusion material that's pretty awesome, right? Essentially it's like having that cool pattern on the front of a soft box so when she had me do this and raise it over she's getting very stylized kind of beauty shot like like clamshell lighting that you see a lot for the beauty work um way would you like the white on the right side of one of these? So this is the equivalent of having, like, a pattern soft box and then another soft box underneath like I've been there, I've seen her do this a million times for like beauty work um and we recreated it underneath a tree which two seconds ago was really crappy dappled light, so just seeing that it looks a lot more natural where versus the black where it's just looks like you have him standing under a building there's nothing natural about it yeah and I would say a lot of people are like oh my gosh, how many assistants do you need all right, this you would need one you have him hold one reflector and somebody else so if it were me on the wedding day it would be with he said, you know the groomsmen are the ushers or whoever the black off overhead and they have light stand kits with little arms that you continue to so yes, west westcott has one that think it's like seventy bucks like one of the side one overtop like yeah, so it has an arm and it's actually made specifically for what the ways I view is made for these so the westcott thirty inches so if you did need to put the diffusion overhead and then have him hold to feel you could do it with no assistance but there's usually someone around to help you out, it just makes it easier. Okay, so would you like to introduce how you might use flash in the situation? Yeah, eso she's used a lot of natural light to bounce in and then, um hope mike well, you just can't don't know we got to switch over to the flash okay, let's, take them one or two questions if we could maybe about natural light were to switch the tether over to the nikon camera. Um, and then we're going to introduce flash to kind of work with this equation as well. Would you like means do you want to stay here? Stand right here. Ok. All right. Ready for question? Yes. Okay. So maria is wondering if you're shooting a wedding, a wedding party, not beauty shots that is not always possible. To use reflectors and diffusers at it is it is very important to catch the right moments and not time to set up that kind of thing. What would be a lindsay? Ask advice for this? Oh, my gosh. Okay, this is a very good question because when I shot weddings yet a lot of time is the moment win over the portrait sessions. What I tried to do is what I called posed camden's. Um, which meant, at least before I caught that moment, I would just direct where they should stand or say, yeah, you guys don't, you know, don't fix that. The tie, for example, whatever it may be. Don't don't fix the tie over there underneath a tree with a dappled light, go stand underneath the porch in other words, if it's moments that you have a little bit of flexibility over controlling you can tell them you know what would be really great look really beautiful in the photo if you go stand over here um if they're standing in a dappled light situation where you can't get reflectors diffusers then you're just going to try to find an area where it's either all highlight we're all shadow as much as possible and then you pick your exposure so you're picking what's more important they're in the highlight explosion highlights if they're in the shadows exposed for the shadows and work with it that way well all right now since we're talking about weddings another wedding question kate ford is wondering in a wedding application what if the family wants to do fund photos under an arbor where there'd be duffel light how could we apply these techniques with more than one person okay, so I've exactly had this question I mean I've had the situation and so what I did is I took my scream jim and my scream jim has diffusion material that stretches out six by six actually had two of them and I had my stepladder and I put it up over the arbor and try to talk it so they couldn't see so it actually diffused the light in the arbour and then I use reflector to put light back in so I was able to just use it's just it's just ah diffusion material like you would see in those reflectors or in that pop up umbrella but it's six by six foot and I actually had six by six foot but times two and that that covered the whole arbor said actually made it pretty simple phone ah let's see her? We've got kenny um what power is the speed lot speed like s so this is a little bit earlier for the f p function to overpower the sun that's right? Well, um what power is the speed light at for the f p function to override the sun? What powers? Your, um your husband flash that's overpower the sun over probably okay, so we have a tl mode so it was said in itself and then just to make sure I switched over to manual we had them on full power so each one of those guys is about fifty five watt seconds so they had to be turned all the way up. So again, not something you gonna shoot all day with but something to get cool shots and get out of there definitely works. And also that person asked about the arbor I just want to say that might be an instance to where would use the flash if it depends on how bad it was but that I didn't I did use thea the screams of material all right so what were your camera settings I would try to jump in right where you left off and just give people an option. Okay, so my camera settings here okay which which which did you like what look I like them all oh please okay. This one was um one five hundredth of a second two point eight was one hundred one hundred one five hundredth of a second and that gave me a pretty bright background. Okay, okay, so if you want dark and dying to do it so what I'm gonna do here is we're gonna go ahead and use the overhead the fusion material thank you for being an assistant step back in if you could let's try to see if we can find that little bit of shade that perfect right there. All right. And remember that if I keep this on t t l um auto f p mode should hook up and just immediately kick in for me so I can literally grab lindsey said ian's two point eight s o one hundred one five hundredth of a second this normally would not sink but because we have auto f p mode already enabled this should synchronize take this photo here and we're going to see what comes up to the flash fire yes it did awesome details will be on my side for the rest of the day I can feel it perfect there it is now, this isn't nearly as pretty as what lindsay was working with this looks like I just went out and blasted this guy's poor face with, um, some bright flash. So what you want to do when you're out here and you're dealing with dappled light is I personally love dappled light because it really gives you that sense of environment. It's not like we're in a studio's let's take advantage of this, so first, we're going to try to control it because we're all about compressing our dynamic range. The lindsay is going to come in overhead and kind of just defuse this off. All right? So now we have that soft box kind of dappled light, all right? And we'll take another photo here and it's gonna help us off right the bat because, you see, we have the hot spots on the face in that last photo, the hot spots on the hair by her defusing that it dials it and we have a much more controlled look, but it still looks very flashing see how brightens up like that. So I'm gonna take this t on go all the way down and just something I've seen people do before us, I want to make sure I mentioned it, you're holding it right overhead. It actually won't get the body so you can actually hold the diffuser more less in front of yeah more in front of them like it would be like a porch or an overhang something like that like in front of them as long as the lights I mean even a little bit of light on the hair is fine because it might create a little bit of atmosphere a little bit right exactly makes them look like they're in the scene so let's do that I'm loving that let's kind of pull it forward let's get a little bit off the back of it it is not on the ears yeah not ears a nose perfect so right about there all right and what I did isn't how I dialed the tl minus three on my flash and we'll take one more photo here alright, we'll see how that looks and really quickly going to see here we still have a little bit of ambien but we've met we've got rid of all the hot spots and by having the flash we get an even exposure on his face so we don't have the blotches on the highlights and all that kind of stuff well maintaining some environment here but by dialing it down to minus three it doesn't become overpower him so you don't feel like, oh my god that's a horrible snapshot photography that we're trying to get away from so the on camera flash really isn't about you soon to go outdoors as long as you add it tastefully rather than trying to overpower everything with it so we took one approach earlier and here I like to embrace the doubtful light just like lindsay did here with natural light with a flash we don't always have to toe hit it with like the bat when we're trying to add some light to a scene you could do the same thing I'll have john go ahead and bring bring that over here um should be a flashing everything triggered on it alright, cool we're gonna bring that over we're gonna get that that direction of light from off camera lindsay if you grab the triggers for me uh get right on the counter over there same kind of thing we're gonna go off camera again with it all right here we just bring it in right here make making it super easy except for him and I'll have you step aside real quick as he's perfect. Okay, should we crank down awesome is gonna put the sugar on top of the camera. Awesome. Okay, so we'll get the two different kind of looks let's just do one right off the bat without anything but I like the light on the hair excellent turn this on now now we've got a flash on see the difference of these perfect so that's just our that's our natural light that's what we're starting with okay? We're kind of knocking it down we're giving us a palette to work with on the face while still getting the dappled light and control flash fire and it didn't the first time I did the second time the second time okay, cool put it back on automotive see what details gonna give us off camera now I'm tempting fate here by going tol on camera and off camera in the same day I've just converted you I think I've converted you I'm pretty sure it was tonight let off on all kind of turn your face over this way we'll get a little more direction of the light beautiful and this is on t t l we've gotta powered up just a little bit now I could go ahead and drop it down some more so the next shot coming and moving over alright beautiful still the tether coming through all right then we'll mix it up even more let's get on where the black side go black we had it right here. Great. Thank you. Now we're just going to little negatives if you want a roof over the top and give us little negative phil over on that side you want negative like with the other stuff coming through still firing out like this yeah, just like that have you bring this in real real close beautiful just like that. All right? And now we're really, really finessing the control. What we're doing is we have this over here on the side this is gonna bring in shadows on that face this is gonna light up this side of the face we've defused the light coming in so we still have the pattern and lindsay's doing a great job of getting the hair and the wrapping everything so we're anchor and him in the scene we have contrast to kind of sculpt out a man space and we have control of the light coming from the side. So with one flash on camera you could do the job no flash you could do the job, you can take away all the light you can have the environment so really quickly suit okay, here the image is coming through really quickly you can see how we've got like that and go back to there we go that right there so it's a natural looking image yet we've skull with the light on the right side of the face. We've got the contrast on the opposite side so that we didn't wash him out it doesn't look too pretty for a man and at the same time we have the dappled light in the hair and the shoulders in the background so by not roofing it off for the black, we kept a lot of that ambient kind of feel, and I just shot this whole thing on t t l so I confirm we made it through it totally converted, committed. Yeah, so just you, khun really approach these environments to different ways on walking with beautiful images, both west. Excellent. So use reflectors for all of these. By the way, if people haven't noticed the common theme here, you should all own a reflector or two. Five and one smoking everyth selectors. People are wondering about the color of reflector that you prefer. There is white, there is a silver and there's, a black and shiny filled and anyway mix of like the white and the gold what is the best here he wanted there's the weave right there. Okay, um that's cool, right? So I'm going to say that there is there's a right reflector for different jobs and I don't want to confuse you a bit long story short of the one thing is most often are silver and white most times, but it is nice to have something like the silver white mix is convenient when, like, remember how, before we had that white, we wanted to be a little softer, but that we had to get right next to their face so you can still have a little bit softer than having silver, but you can back up a little bit more so it looks it has more qualities of the whites kind of a halfway between um if I'm photographing darker skin subjects outside, I have the silver gold we've reflectors in this game of photography or one of the less expensive things, so I do have a few more of them, but honestly, most of the time I have my thirty inch westcott, silver white just easy to move, carrie, we just I just flew in with the job and all the reflectors were using are ones that were in my kit that I just did a little weeklong job with. So the scrim, jim, the large round one, the two, thirty two inches that we have and then this five and one last light with the handle I used all week last week working and then you saw them. They all came into play here teaching, so they are like lindsay said, the most affordable piece of gear, the photography world so don't be afraid to go out investing awesome, and I have a question I love how much our internet audience you guys out there are big into macgyver solution, so I'm serious I've always used like when I was twelve like foil and and poster board and all of that you guys have any macgyver solutions and are they how do they compare tio regular reflectors? I mean my go to macgyver solution is I used white foam core I'll use ah white foam core and black foam core um those of reflectors or sometimes I'll have a white on one side and then I'll do the same thing um foil on the other so I have silver, white and it's really, really inexpensive. I just think it's really convenient because I can if I forgot the way or if I want to have something that's a little sturdier to hold onto um then you know a big kind of floppy round reflector sometimes the white foam core is great for phil. How about you? Yeah, I could remember job a shot recently where I was using a beauty dish in studio strobes but I needed a kind of flag off part of the beauty dish so I ended up snap in one of these reflectors and half the black side and gap taping it around my beauty dish to use is like a lift to cut off the lights. I mean, gaff tape allows you to yeah, anything it's like twenty thirty bucks a roll but I mean it's just so much fun taping the crap out of stuff and I did aa I did a photo tour earlier this year with the woman that I believe will be on court of live at some point um lou freeman and what she would do for um reflectors that she was used cake pants so she would go to one of those party city places or whatever and get big cake pans especially if she traveled someplace that job came up that she didn't didn't expect you know and so she didn't necessarily have the gear we'll grab the big cake man I have never done that but I thought it was a good idea get over here and you go with divers all around the world cake pins about the cake then all right, there have been numerous people in the chat room this last segment wondering if you can show an example of three quarters or full body using the same techniques okay instead of close that um you could definitely do full length it's just you'd need a bigger diffuser because right now the diffuse that we use for this example a cast shadow for him um about midway down his body so he would be able to do mid length. You have to use something bigger if you wanted to cover full length or if you khun change where it is get it closer like maybe if you're really far away it might be a little more difficult I that's why I have my scream janet just running around yeah, we want to show that what distance does diffuser won't stand over here we're going to show how distance effects how diffuser will work you can talk him through it yeah yeah let's let's strip that down so you were really lucky with what we like the crap light we have right now because it's so directly overhead look at lindsay shadow you guys wanna look on the ground lindsay if like someone pointed out earlier fortunately isn't seven feet tall so the shadows like is it all the way there? But look how easy this is to cover I mean, we can almost cover all of lindsay with what is essentially a thirty inch reflector now the lower the sun gets in the sky the longer her shadow, the bigger the diffusion material. We're gonna need this guy right here if I'm shooting most of the day that's like a forty or fifty inch if I have someone hold it aiken get usually three quarter or almost yeah I could get a full body get a full body here with a forty or fifty inch reflector but right before we did this lindsay said I always have my scrimmaging with me john if you got the bag just sitting right on top a little black bag, the skinny narrow one there that is the scrim gym bag so I mean in here I can have two eight by eight foot frames and the material to cover them in this tiny bag that travels everywhere with you and if you look at that compared to this that's only the six by six version it breaks down in the bag the same size the eight by eight so if you look one's wider one's longer but you're getting the picture here the scrim gyms are invaluable because they break down so small and you can do multiple eight by eight panels out of that bag but if you don't want to go there out there a little more expensive, you just want to go to reflect her out this is a forty or fifty insure and you can cover most people throughout the day and one tip some people I've had this question workshops what do you do about the shadow on the ground if you're shooting from an upward angle you see the shadow more the lower you get to the ground, the more it reduces it and you won't notice as much. So if you don't like for example, seeing that shadow you won't notice it much at a low angle camera angle not me, not the model sorry, I'm being photographer and model right now um but yeah, so eric when he was shooting the hollywood sign um if you noticed the scene was actually elevated a little bit and he's almost shooting to it you mean you hardly saw any of that shadow at all. It's not distracting? Yeah, there's extra reflectors we're talking about. I was laying them on the ground and laying on those reflectors shooting with the telephoto lens at her that's they didn't get dirty. Okay, does it say were actually reflectors for any purpose just to keep me from getting there? So that's why I keep extra reflection? You can lay on him, you can use them to reflect stuff like someone hit me up on facebook there like what we do with all my extra ones. I was like, I just lay on way had like the model sitting earlier on the ground, sit your model on them, play the dress out a wedding dress that way you're not asking your bride to like, okay, plop down on the dirt or something I also bring I was having my camera bag, uh what went into a wedding? White garbage banks? Because when you have them white garbage bags that hangs out a little bit sometimes just looks like the dress, so you don't have to photo shop it out as much. Can youjust cemal real quick with the distance of the diffuser? Just the quality like I know that something I forgot about it before we got it, guys garbage bags, cake pans after alright, so really far away this is the same effect that you have with your modified pretend this is a big soft box with the strobe light as our light source, you bring the soft box closer the like it's, softer as you bring this closer. Look at how the light gets softer, it's just like moving your studio strobes around that's what need about learning his principles? You can learn them with reflectors or speed lights and move in the studio. Everything applies or vice versa that much softer, much harder. So we're just increasing the light source surface area in relation to our subject and something to keep in mind too. It's sometimes confusing, like I know that I want you first said softer and I was a little confused because it looks brighter closer because it hasn't had its long to kind of spread out. Get dimmer when you've hold it far away, it'll look dimmer so it's, inverse, square looking square a lot. But I just have to keep that in mind. If it's closer, you hold the diffuser really close to their head. Oh, brightened everything up so you have a bright scene behind them if you hold the diffuser closer. Then you'll be able to bring some of that great scene into the exposure versus if you want it to be blown out. You told that diffuse, you're really far back way up here. And then it's gonna be dimmer on my face. Look more like shade versus bright sauce box, glowing like, thank you, thank you.
Class Materials
bonus material with purchase
Ratings and Reviews
Victor van Dijk
Besides all the more or less 'technical, theoretical stuff', the greatest thing I'm taking away with this outstanding course is the plain joy and FUN of trying all sorts of (crappy) lighting solutions!! Speaking for myself, and I suppose also many others, as an 'advanced beginner', I strongly tend to end up to my eyeballs in all technical nitty-gritty, gear 'n' stuff, that I totally mis out on all the sheer FUN of trying out, and often 'muddling through' all kinds of lighting setups! Such a joy to see the fun exchange between Lindsay and Erik! Really catchy. There should be more classes and courses like this, redirecting students to what it's actually all about: sheer creativity and fun! Having said that, Lindsay and Erik demonstrate that there is hardly any crappy light situation that can't be overcome by creative thinking. And more often than not, it doesn't have to be high-tech or difficult! They really showed an exhaustive list of crappy light situations AND their solutions. And I highly commend Lindsay and Erik for their fun energy, and even more important, pragmatism and frankness. I recommend this course to ANY photographer AND videographer, no matter 'beginner' or 'highly advanced'! Lighting is the basis of it all, and most of the time, it isn't perfect...! I highly re
Julie Addison
I thought I understood about light before I took this course. How wrong could I be? I have re-watched this course over and over and I just love it. Quality of light, direction of light - so many crappy light situations. Learning how to actually set a white balance instead of purely relying on the camera presets and learning colour correction by the color checker was also invaluable to me. This course is so affordable. I would recommend it to anyone from beginner to advanced as you will get more out of it than you think. I love the way Lindsay and Erik work together. No right or wrong way - just showing the differences in their styles to accomplish the same end result. Well done guys. Now to have more courses by Erik would be great. Again, can't' thank creative live enough and Erik and Lindsay for this course. Love, Love, Love It!!!!
a Creativelive Student
I hope I can tune in tomorrow. Erik and Lindsay, you guys were awesome today. Some of the things I needed some refreshing on but you definitely had a way of educating. I thought the demos were great and really validating. Light is a difficult thing to keep on your good side, especially with me, someone who primarily uses ambient and available lighting scenarios. This course is great and I'm planning to tune in tomorrow because I really want to see what you have in store for outside. Best of luck guys!! -Sim
Student Work
Related Classes
Lighting