Light Painting: Equipment Overview
Lesson 6 from: Capturing and Processing Night PhotographyTim Cooper
Light Painting: Equipment Overview
Lesson 6 from: Capturing and Processing Night PhotographyTim Cooper
Lessons
Class Introduction
01:47 2Safety And Scouting
01:28 3Photo Pills App
03:45 4Civil Twilight Image Prep And Test Shots
12:40 5Setting Intervalometer And Capturing Cityscape
04:04 6Light Painting: Equipment Overview
03:20 7Light Painting: Composing The Scene
03:14 8Light Painting: Setting Sky Exposure Ambient Light
08:06Light Painting: Color And White Balance
05:12 10Light Painting: Mixing Warm And Cool Light
14:58 11Review Cityscape Library
02:01 12Opening Images In Lightroom And Moving In Photoshop
19:29 13Cityscape Image: Layers Theory
07:56 14Cityscape Image: Selections And Mask Theory
05:48 15Cityscape Image: Selection Using Color Range
08:27 16Cityscape Image: Altering Masks
05:36 17Review Light Painting Library
03:01 18Light Painting: Opening As Layers In Photoshop
11:00 19Light Painting: Layer Masks
12:05 20Light Painting: Edit Review
07:59Lesson Info
Light Painting: Equipment Overview
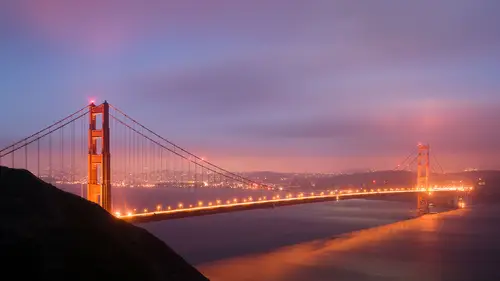
Alright everybody. So we found this great spot just below the bridge. We've got some really cool structures here: concretes, stairways, metal, and I think this is gonna be an awesome place to light paint. So we're gonna launch into another shot here, but before we do that, I just kinda wanna show you what I'm using as far as equipment goes. Now, the equipment that we're using here is pretty much just what we saw in our last shot, but we're gonna add a few things in. This is gonna be a really, super long exposure, maybe 30 seconds, a minute long, so we're gonna want our nice, sturdy tripod. Um, course we're gonna want a nice, sturdy tripod head. This is what marries the camera to the tripod, so it's super important. The next thing is, I've got my cable release. This way, if I'm going into minute, or two-minute, or four-minute long exposures, not quite sure what to expect. But if we do, I've got my cable release ready to go. Then, most importantly, is the light painting tools. I've got a...
couple of flashlights here. These are both coast flashlights, and I really love these. They're waterproof, they're super durable, and the beam is really, super smooth. Y'all maybe remember those old Eveready flashlights that had that really weird, kinda like, design in the center. This is perfectly smooth from top to bottom. And what that allows me to do, is as I'm light painting across smooth objects such as walls or things like that, it gives a nice, even look to the image. There's also beam control, zooming in and out, lots of advantages to these coast flashlights. I also have what's called the Luxli Viola here. And this is a great tool. What this allows me to have is a slightly broader beam. So unlike the narrow beam of a flashlight, this is gonna be quite a bit wider. I've got this little diffuser snoot here, and this is really cool, because it allows you to actually control the level of light. It can go really bright, really super dim, and this is the key. I can change the color of the light from warm to cool. So in a situation like this, we're going to have fairly warm skies because of the sodium vapor coming up from San Francisco. So it's gonna kinda look almost like an orange color, very similar to the color of the bridge, actually. And I may wanna marry that color together with a warm color in the foreground, I may wanna make it a little bit cooler, and so I can do that very easily with the Luxli Viola. And the way I can achieve that on my flashlights, is by using some gels. So most LED flashlights are fairly cool, and if you use 'em without any kind of gel, you get a fairly cool light. And I'll just throw this light out onto the scene here, and you can see how it is pretty cool or neutral in comparison to the sky. Now if I put on that gel, you can see how warm that light gets. So I'm gonna try several different things, and we're just gonna see what turns out from our experimentation.
Ratings and Reviews
Phillip Ziegler
This course, along with the others by Tim Cooper, are outstanding. His demonstrations and explanations are so clear and easy to follow. I've been out doing long exposure night photography using what i learned from Tim and and delighted by the results.