Shoot: Three Light Business Portrait
Lesson 7 from: Business Headshots and PortraitsDan Brouillette
Shoot: Three Light Business Portrait
Lesson 7 from: Business Headshots and PortraitsDan Brouillette
Lesson Info
7. Shoot: Three Light Business Portrait
Lessons
Class Introduction
05:21 2Business Portraits Overview
04:14 3How to Find Business Portrait Clients
07:05 4Business Portrait Lighting Philosophy
07:56 5Portrait Lighting Location Kit
09:42 6Shoot: Basic Lighting Setups
09:18 7Shoot: Three Light Business Portrait
13:41 8Posing Basics for Business Portraits
08:04Lesson Info
Shoot: Three Light Business Portrait
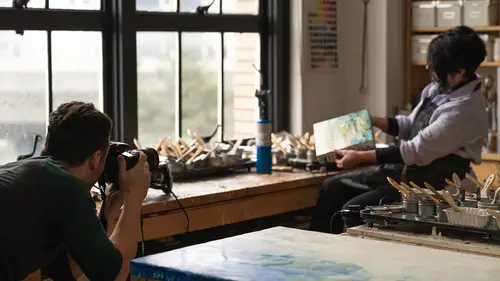
Let's start setting up the three-light setup. Our first layer, we already know, we have this Profoto umbrella set up, we're gonna leave that as is, so you can sit right there. Our second layer is a second B with our Softlighter umbrella. This is the 36-inch with the baffle on it. Just so you guys can see, I don't know if any of you guys use these, they're about 70 bucks, pretty inexpensive. It's got a nice satin silver inside, the strobe fires into the umbrella, and then it has this sock. You just put it over your light, put it over the exterior of the umbrella, it wraps around there. That way, you have nice, diffuse light. I like to put that directly over camera, so we're gonna leave that here. We'll turn it on. This is where things get a little tricky, because you're dealing with two different sizes of lights, different distances. How many of you guys know about light ratios? If you don't, this is a good time to talk about it. Light ratios are just the metering of light from the side...
of the face where your main light's coming in to the shadow side. If you think about a ratio of 1:1, that means things are the same. That means if I'm to meter on one side of the face versus the other, the exposure's gonna be the same. In this case, they'd both be f/8. That's a little flat for me, the lighting's a little flat. I like to have a little bit of contrast. Every time you go down a stop from your fill light compared to your main light, you lose half a ratio. What that means is a 1:1 ratio is f/8 to f/8. A 1:2 ratio, or 2:1, is f/8 to 5.6. You just go down a stop on this side. Then it doubles. A 4:1 ratio is f/8 to f/4. Anything beyond that, we're probably not gonna use for business portraits, 'cause it's gonna be too high contrast, but generally speaking, I like a good 2:1 or a little less ratio, so I'll actually meter both sides so you guys can see what we're gonna deal with here. The fill light's up. We already know that we had f/8 for the main, but this is obviously adding more light to the entire shot, so we need to re-meter both. What I'm going to do is put this just so it's above me. We're gonna get as high as we can here without hitting anything. Gonna angle it downwards just a little bit to make sure that we're hitting our subject. We have that powered up, I have no idea what the power is. It says 8, but that means nothing right now. What we need to do is use our transmitter and use our meter, and we're gonna re-meter. What I'm gonna do, is I'm gonna meter the highlight side of his face where the main light is compared to the other side. Let's step in here. I don't want to to block my lights. We need to aim this a little bit better. That should be about good. Alright, so we're gonna take two meters here. (flash clicks) We're at f/8 still. And now on the shadow side. This is where our reflector was helping us before. (flash clicks) We're at 6.3. A 2:1 ratio would be 5.6 to 8. We're a little under that. I'm okay with that. We're gonna go ahead and call this good for now. If we notice when we shoot that we need a little more fill, we can turn it up. If it's too bright, we can turn it down. The last thing I want to introduce for our three-light setup is our strip. This is gonna be our accent light. I'm gonna put that just outside of the background. I'm gonna tuck it as close to the background as possible. That's perfect, John, thank you. You'll notice for those two lights, I'm using B1s. I like to use those because they don't have any cords. I don't have four B1s, I only have two. Then I have B2s, so that's why I like to tuck this guy back here, because it has some cords. I don't want anything to get in the way. The power button's a little tricky 'cause I half ripped it off. There we go. Again, it's an arbitrary number at 7.6. That doesn't mean anything based on distance and everything. We're actually gonna meter the back of his head. You can do this to taste by looking at your shot and everything like that, but knowing that the main light's coming in at f/8, I want this to be a gentle accent light. I don't want it to be blasting. If I had an athlete or something like that, where I wanted him to look real masculine and strong, or if we were shooting a soccer player and we wanted it to look like it was stadium lights, I would turn up my accent light a lot. For a business portrait, I want it to be subtle and barely noticeable, but just enough to separate him from the background. With our main light at f/8, our fill at 6.3, I want this to be closer to 5.6, so we can actually pop a flash and measure what our accent light is. I don't do this for every shoot, but I think for purposes today, it's important. (flash clicks) We're actually at 6.3, so I'm gonna turn this down just a third of a stop so it's at 7.6. We're gonna go to 7.3, that should be 5.6 now, so we're gonna call that good. Turn off our meter. One more note with our accent light is I like to have it ahead of the background. I'm not using a grid today, but one of the reasons I like to is I don't like a lot of spill. I'm actually gonna move, John, I'll have you step out real quick. I'm gonna move this out just a little bit. We're a little tight on space, but I'm gonna turn the stand and just bring it back a little bit further from him. You can see, it won't really bleed into the background, and it doesn't matter that much, 'cause we're gonna, generally speaking, we'll cut them out. Then I'm gonna raise it up just a little bit so it has a little bit downward angle to it. We're gonna go ahead and call that good. Alright, with all that said, I'm gonna take one last meter reading from my main, so I make sure I'm at f/8. Nothing should have changed, but I'm a little bit picky about this. Alright, here we go. (flash clicks) Oh, we went to f/9. It's because we're adding all these other lights and bouncing things around. I'm actually just gonna adjust my camera up to f/9. We'll go ahead and shoot. A lot of times I'd reconfigure lights and all that, but it really doesn't matter. As long as you have it matching your meter, you know you're properly exposed. Here's our three-light setup. The only thing we've added, fill light, and our accent light. The main light, we didn't change anything. We're gonna go ahead and take one test shot. I'm gonna have you look right here. Turn just a little bit this way with your body, and then head back towards me, right there. Alright, getting a little closer. One, two, three. (camera clicks) Alright, here it comes. What we have here, I think there's a little too much shadow on this side of the face. That means we're gonna turn up our fill light ever so slightly. Right now it's at 8, we'll go up half a stop, take one more shot. I'm actually gonna bring it in a little bit too, somewhere in between. We'll see if we overdid it or not. One, two, three. (camera clicks) You should see the shadow side, Yep, it lightened up just a little bit. Here's the before, here's the after. Again, we can adjust, in CaptureOne by bringing up the shadows ever so slightly. And then also, In fact, I'm gonna shoot one more at f/8. I think I might have mis-metered. One more, nose this way ever so slightly. One of the things, I'll talk about posing in a minute, but I'm just watching where the catchlights are gonna hit from the main light right here. One, two, three. (camera clicks) There we go. This was shot at f/8, I actually like that better. That was what we were metered at originally, so we'll stick with that. This, again, is just as clean portrait. I haven't cropped or anything like that. A lot of times, I'll ask my clients beforehand if they want shoulders to be cropped in on, because sometimes they have people floating within a frame. If you cut off their shoulders, it'll have a real awkward look in a photo. So a lot of times I'll make sure I'm far enough away from the subject to let their shoulders fall off. This is just, nice clean portrait, gonna up the shadows just a little bit. It's pretty neutral. That's basically my three-light setup. Again, a nice, large, soft main source, with diffusion. My on-axis flash directly above my camera to fill in the shadows from the direction that I'm viewing them from. Then my strip light, that's just... Generally speaking, I use a 1x3, that's a 1x4, it really doesn't matter, they all do the same purpose. The idea is to have something that's tall and skinny, so if there's a wall on the side of your makeshift studio, it's not in the way and sticking into your background. I like to keep the accent light just out of the way. That's basically it for what I do for my three-light setup. One other bonus setup I want to add on, a lot of people don't want to, they don't have room for this in the area they're working, so I like to use a beauty dish as well. We're gonna introduce that. It's not something I typically do, but I've had people ask the question. We're gonna throw that on this main, and shoot one quick photo with that. Actually, you know what? We'll just replace the, I'll put it on the accent light, and then we don't have to take that umbrella down. So we'll take this guy off, save that for when we're moving on to 3/4 length. We'll set that over here. A beauty dish works, it has its moments for these type of portraits, so I like to keep it really nice and close. Generally speaking, I'll use a diffusion sock too, but if you don't have that... (mumbles) If you want to grab that, that'd be awesome. We'll keep it nice and close, and I'm actually gonna put that from the opposite side. David, I'm gonna have you turn this way. We're just gonna have you look back towards camera as if it were where it was before, yep. We're gonna light from the opposite side. This light's gonna be off, it's not gonna be firing. Turn that guy off, and then we're gonna have to re-meter, because a beauty dish is a lot brighter than a giant umbrella. This is just the Profoto B2 with the soft light white beauty dish from Profoto. We're gonna angle that guy down a little bit. We're gonna throw this diffusion sock on here. Should fit pretty snug, and it'll really soften up the light, it'll take off about, oh, one, one and a half stops in general, and just soften up the light. Again, when you don't know who you're working with, with a shoot, it's nice to have nice, neutral light. I like to move it as close as possible. One of my things with lighting is, and it's just generally known, is the closer the light source is to your subject, the softer it's gonna be. The closer it is, you're also gonna have greater falloff, but with a nice, tight portrait like this, we're not worried about lighting his hands. It's just a close-up business portrait. We're gonna bring that in, I'm gonna let the beauty dish wrap around him so we're feathering it in front, putting it from a similar angle. Then, John, I'll have you hold that white, white reflector, 'cause we're not gonna be using any, much fill here. This is what I'll use if we just have a one-light setup with the beauty dish. Let's meter real quick, you can leave that in there, that's fine. Use our transmitter and our meter, we're gonna go for f/8 again just to keep it consistent. Turn that on. I can already tell it's gonna be pretty bright, so we're gonna turn this down a little bit to start. We'll meter on the forehead, (flash clicks) f/9, we gotta go down a third of a stop. This should be f/8. (flash clicks) It is, so we're ready to go. The one nice thing about having Profoto lights, or any lights that have digital controls, is when the meter reads f/9 and your controls, such as the Profoto, are in tenths of a stop, you know that a third of a stop from f/9 to f/ is just three clicks. Or 3.333 if they have that type of thing. Someday they probably will. With all that said, we're gonna do our beauty dish portrait. You can turn a little bit more towards me, even with your feet. I know there's a lot going on there. There we go. I'm gonna be nice and tight. This should be pretty flat-lit with this reflector. One, two, three. (camera clicks) Same idea. You can see, let's do one without the reflector at all, just so you can see how the shadow is. One, two, three. (camera clicks) Alright, perfect. You can relax. You can see, there's with the shadow, there's with that reflector. Again, if you don't have space in the studio you're working with for a big sixty-some-inch umbrella, bringing in a beauty dish nice and close with the diffusion sock will be a decent substitute, as long as you get it close. If you have to move that thing far away, the light's gonna not be nearly as flattering. I suggest, if you can, definitely use the beauty dish close up. If you can't, bring in an umbrella. There's the difference between the large umbrella, nice, soft falloff in the shadows, the beauty dish obviously has a little more shadow to it, but it's just up to you. They're both, generally speaking, your clients are gonna like either one. They're not photographers, otherwise they'd be taking pictures themselves. This is nice and clean. I prefer this look, but it's all up to you. The other thing you'll notice with the beauty dish is the background's gonna go darker, because it's a smaller source closer to your subject. The background's gonna go darker, that's your inverse square law working for you. The closer your light is to your subject, the faster it's gonna fall off before it hits the background. If you want your background to get lighter, you either need to use a larger light, or move that light away from your subject. Alright, let's move on, let's go back to the keynote. You can relax for a second, you can just stay there. We're done with the beauty dish, so if you want to take that off and throw the strip back on there, we're gonna go back to our three-light setup. Again, we covered our one light, our soft main light, which can either be the big umbrella, or it can be the beauty dish, and our white reflector. Or we used our three-light setup with our umbrella, our fill, and if you don't have a fill, if you just have an umbrella and a reflector and an accent light, that works too. That's kinda the in-between for your two-light setup, if you only have two B1s or two lights, whatever you may have. That's my business portrait setup. Nice and clean, simple, pretty straightforward.
Ratings and Reviews
TRacy Sullivan
Great class! Lot's of usable information. Loved Dan but wholly cow he talks fast. lol I had to rewind him a couple of times. Thanks Dan - You rock!
user ccf5d7
Loved it! What a great course. I certainly learned form this one and found it to be excellent. I am a full time photographer specialising in Real Estate Photography but I am asked every year to shoot head shots (hence buying this course). I found the information to be really good and was a bit surprised as I did not expect to learn as much as I did! I mainly learned small things here and there but they are invaluable for me!
user-d1a938
I really enjoyed this class! Lot’s of good information! Thank you so much! 😊