Business Portrait Lighting Philosophy
Lesson 4 from: Business Headshots and PortraitsDan Brouillette
Business Portrait Lighting Philosophy
Lesson 4 from: Business Headshots and PortraitsDan Brouillette
Lessons
Class Introduction
05:21 2Business Portraits Overview
04:14 3How to Find Business Portrait Clients
07:05 4Business Portrait Lighting Philosophy
07:56 5Portrait Lighting Location Kit
09:42 6Shoot: Basic Lighting Setups
09:18 7Shoot: Three Light Business Portrait
13:41 8Posing Basics for Business Portraits
08:04Lesson Info
Business Portrait Lighting Philosophy
Lighting in any form of photography is obviously one of the keys. Whether you're shooting landscape photos or still life photography, or in this case, portraits, lighting is essential to make the photos what they are. So, my lighting philosophy is pretty simple. I want flattering portraits that convey your client's message. So, one of the things that I'll talk about in my meeting is what's the goal with these photos? Are they speaking directly to a client? Are they gonna be more lifestyle-based, where you're wanting the client to almost look like they're looking at a nice, friendly meeting between their client and one of their bankers or mortgage lenders or something like that. So, what is the setup gonna be? What's the overall message? What's the mood that they want to convey? 'Cause then you can start workin' it to figure out how you can... What you can do for them to help them convey that message to their potential clients. So, that's your overall goal. What is goal of this lighting...
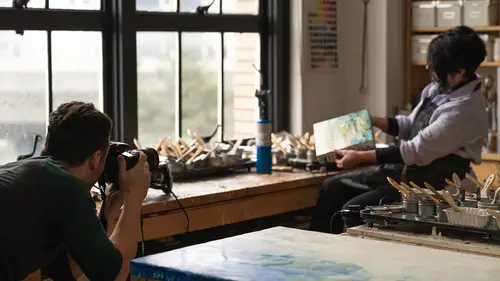
? Is it something on location? Is it something in the studio? What are you gonna use? How much equipment are you gonna use? Is it light and airy? Is it a little more dramatic? Those are the things I think about because when I'm making my lighting setup, I don't wanna bring a whole bunch of extra equipment. I definitely don't wanna be underequipped, because there's no worse feeling than getting to a shoot and not having what you need and being stressed about it. So, I always try and figure out what my overall goal is with myself and the lighting, and the client's goals. That way, I can figure all that out beforehand. Because another thing I think is really important is anytime you're on a shoot... Let's say I'm photographing this guy. Chances are, and this is true, he didn't necessarily wanna be spending a lot of time in the makeshift photo studio at the law firm. It was just a little conference room, with seamless setup. He came in there, we had five-minute slots for each person. So, they'd come in. We do 16 different poses, some of 'em seated, some of 'em standing. One lighting setup. I'd tether everything to the computer so they can see 'em right there. And you need to be pretty exact and purposeful with your shooting. So, having someone like... Only being able to work with somebody for five minutes, you need to be able to put them at ease, be confident with everything. So, that way, their confidence can show and they're not so much worried about, "Oh, this guy doesn't know what he's doing," or, "This woman has no clue how to pose me or lighting." So, you need to really know what you're doing and have that figured out beforehand, because if you can test that on someone at home beforehand, before you go to the actual client, it'll make it a lot easier because you're not just runnin' on the fly. So, I'm a big believer in prelighting everything at home the day before. And now, after doing this for several years, I have all these lighting setups in my head or written down in notebooks, where it's like, this is my main light. It was at this power for this particular setup, and now I can go and set 'em up and work on the fly, but it was all that testing and experimenting beforehand that made me feel comfortable when I go into a room with a lot of other individuals to take their portrait that I can focus on them, and not worry about what my lights are doing. So, having that technical setup and understanding beforehand is the key. I like to light in layers, and for me, that means my first layer is my main light. That might be your only layer. It might be a one-light setup. My second layer is always my fill light. It doesn't necessarily have to be a light. It could be a light reflector. It could be a B flat. Anything that's filling in those shadows, that's my second layer. My third layer is my accent light. That could be your hair light. That could be your background light. Anything that adds that third dimension where it's bringing the person away from the background or highlighting something, accenting something. Your accent light. I usually light in those three layers. There can be additional if you're lighting background and everything else on top of that. But, generally speaking for business portraits, if I'm gonna haul this gear on location to the lobby of a bank, I don't wanna bring everything I own. I wanna think about these layers beforehand. So, I'm only bringing enough stuff where I can make as few trips from my car to the bank lobby as possible, because generally speaking, I don't work with an assistant on a lot of these jobs. It's just me. I drive my car up, I have a little SUV. Pull out my gear, haul it in, set it up. I don't wanna be makin' trips back and forth and gettin' hot and sweaty trying to set up for the shoot. I wanna know what I'm gonna need beforehand and what equipment. When I think about it in terms of layers, I always think, okay, for my main light, for this client, we're gonna go with this. For my fill, I'm gonna need this. I know that the ceiling's only this tall in this place, so I can't bring such a huge light. Just planning it out so you feel comfortable and prepared. And then again, your accent light. For me, that's generally speaking, a strip box. I know we have one over here. We'll get into that when we do the actual setup. But, somethin' that you can tuck away in the corner, because you never know how big or small the space is going to be. So, I try and be as least intrusive as possible to their space and maximize that space for me. My main light, generally speaking, as I said before, you might have one single solo shoot in a day, or you might have 40 individuals walking through a room. I try and pick a large, soft source for my main light, because if you pick something like a beauty dish or a silver umbrella or something like that, it's gonna be a harder light source. It's not gonna be as flattering to a lot of people. Where you pick something like, in this case, we're using the Profoto XL umbrella with diffusion. It's gonna be a nice, large, soft light source that looks great on almost anybody. It basically just looks like a huge window and everybody looks good in front of that. So, I know whoever walks through the door, this light's gonna be flattering for them. It's gonna be the best that I can bring to make everybody look good. That's the case in this photo, too. You can see he's lit from the top of his head all the way down to his hands. This was probably only shot in, I don't know, maybe a 12 by 10 foot room? So, that umbrella was taking up a lot of it. But, being able to position that properly, let's me take three-quarter lengths portraits in any space and know that the light's gonna be there for whoever walks in the door. My fill light, it's either a white reflector, a B flat if I'm in studio, or a soft lighter umbrella on the camera axis. What that means is I'll use a 36-inch soft lighter umbrella, so it's a bounce umbrella with a front diffusion. I'll show you that when we get set up. I put that directly over the camera. I like having my fill directly over the camera because then it fills in the shadows from the same angle that I'm looking at them, from the camera. I also put it nice and high, so it's just over my head filling downward. We'll talk about that when I'm doing the setup as well, and you guys will see how it works. I'll actually light in layers. We'll light one, add our second light, add our third light, so you can see how each light affects the shot. All right, and then the last is my accent light. Again, that can be your hair or rim light. I always use a strip box. A lot of times, I'll put a grid on it, but not always necessary. The strip, it holds pretty well. Like I said, I like using a one by three or one by four strip so I can tuck it in the corner and get it out of the way. Just because you don't have a lot of space to work with all the time, and it works really well for that. Here's just another example. This is of a recent photo of a banker. They wanted a little more personality, so we had someone off camera to the right. Before we went into the shoot, they gave me the names. We were photographing 12 different bankers that day. I got a few fun facts about each one. Someone's planning a trip to Rome. Another person is a big football fan, so I figured out what team so we could... Just so I can make them comfortable by talking to them about things they're interested in. Because chances are, he was not looking forward to getting his photo taken that day, but by being able to talk about his kids or dogs or upcoming trip, he could talk to one of their marketing people who was just camera right, and get distracted and I just waited for those moments and was able to capture. And that was a good way for me to be able to get actual personality without forcing it or being cheesy or having to come up with jokes. This is just an example of that same lighting setup. Three lights. We'll do somethin' like this today, too.
Ratings and Reviews
TRacy Sullivan
Great class! Lot's of usable information. Loved Dan but wholly cow he talks fast. lol I had to rewind him a couple of times. Thanks Dan - You rock!
user ccf5d7
Loved it! What a great course. I certainly learned form this one and found it to be excellent. I am a full time photographer specialising in Real Estate Photography but I am asked every year to shoot head shots (hence buying this course). I found the information to be really good and was a bit surprised as I did not expect to learn as much as I did! I mainly learned small things here and there but they are invaluable for me!
user-d1a938
I really enjoyed this class! Lot’s of good information! Thank you so much! 😊