Lesson Info
8. Assemble the Bag
Lessons
Lesson Info
Assemble the Bag
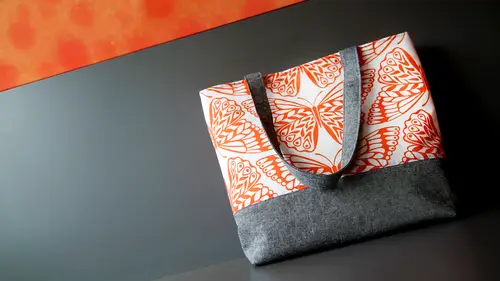
All right so the next thing we're going to do is assemble the bag finally so we have our exterior we have are lining we have our handles so we need to do now is get the handles attached to the exterior we're going to machine based those and machine based it's just um it's like regular hand basting where you can use a larger stitch because you're just like trying to hold something in place long enough to decide if that's where you want and then tio secure it in between layers so you could do this without machine basting at first but the more layers you get the more shifty stuff can be and this just I think it's just easier to baste it so what we're going to do is measure in from the side seen about four inches let's put a little pin there actually you know what I never oppressed my side seems on this bag I'm going to take a little time out here and do that just because I want when we get to the next step I want everything to be nice and smooth and flat so just gonna pop this back inside...
out and do that and get this other side come on okay all right now we're gonna measure from the side scene for the handle placement okay put up in here case when a double check with this one who actually we have this a little bit further pretty good okay so that's foreign just to the outside the outside edge of your handle ok so the's handles and this fabric is the same on both sides so I'm not going to worry about that um of course it's the same on both sides because it's a folded piece of fabric I'm just saying all right so you're going to place the rock edge of your handle um next year four inch mark and we'll just penned that in the place and then you're going to take it around and you know you don't want to have a weird twist in it or something you just want to bring it around and place that on the other edge and then I'm just gonna copy that on the other side for my second handle so we'll just look at where the first one is sorry we were the four e on the four inches in when you're marked is the is that the but the outside edge of the strategy thing right so the pen will be basically between the handle and the science team got it okay those look aligned all right so I'm going to take this tow the machine I'm just going to stitch an eighth of an inch from the edge and just do a little stitch across each of those toe hold them in place then let me so all the layers together we don't have to worry about those moving around and I need to move my needle back to the regular center position. I don't have to, but I want to do that before the next part where I forget and this, um, you know, I don't need to worry so much because it's just a machine based about having, like, super control over the stitch line. All right, I've got those based it on, and we are ready to attach the lining in the exterior bag together, so I've got my exterior right side out, and I have my interior or lining inside out. I mean, wait, yeah, right side out. The main point is you want the right sides together, they could both be the opposite, but you want to put one inside the other and have the right sides together and have the handle's sandwiched between the two, so push that down in between the layers, okay, so, um, I'm going to pin the side seams first and get those seem allowances laying down flat, grab some of my pens over here all my pins end up by the machine happens at home, too. Ok? So I've got the side's pinned those air kind of the most important parts to make sure they're aligned and I feel the straps in there. You want to make sure that none of the loop of the strap is kind of like coming up where you're going to so you want to make sure that all hanging down nice inside the bag and this is lying flat between side seems okay now that that's all secure I'm going tio so run the top this is a half inch seem allowance so go all the way around and then we're going to do our little terming that we do intersecting seems and then we'll turn it right side out and then it will almost be a bag all right? So I have that zone all the way around the top and I'm going to trim thie accessible seem allowances here of the corners for the side seam okay, so this is a good time to make sure that all these little corners that you trimmed off aren't like in the bag is the the feasible places kind of sticking, you know, like velcro and so a lot of little threads and things tend to stick on it and we're going to be turning this right side out and you don't want a bunch of like debris from your sewing table stuck between the bag so all right so way are going tio turn this right side out and stitched shut the lining so we have this opening that we left before and wear basically going tio scrunch up the outer bag and pull it through that hole and you may find that maybe the opening isn't quite big enough and then you'll need to get your scene seam ripper and pick out a few stitches but it looks like we have plenty of room here so now we have seen these bags um so we have the exterior and the lining and I am going to close up this hole in the lining before we shove it down inside the exterior bag because we want to make sure that that's um finished cleanly so if you can kind of describe this on either end and kind of like the bottom of the pocket that we left the hole left the opening for turning the seam allowances will kind of naturally fold in and if they don't you can just take this over and give her that press so they'll fold in a half inch just like your seem allowance so there's a couple of different ways to do this one is to hand stitch it and you can use a stitch called the latter stitch which basically each of your stitches as you go across looks like the little rungs of the ladder but I like to just top stitch this on the machine because I find that and it's down in the bottom of the bag you won't see it and it's just a little bit stronger and it's faster so I'm all for that, so I'm just going to take this to the machine and make sure that I know I'll put an extra pain here at the end I know where my machine stitching ended from before so we don't miss ladies up in and I am going to switch out the threat on my machine though, because I want I wanted to at least match if I get to have it be seen with the top stitching so off to do that real quick oh okay, we're really close to the big reveal all right? So we're going tio push this lining down inside the exterior and we need to give this another really good press, especially on this top scene because we haven't pressed that yet and we have to add top stitching so it's pushed this down inside. This is a good time to get all those little stray threads off and you can kind of tug on the handles to help bring some of that seem out and to kind of finger process along the edge to get you know really into that seem so that's fully turned think that's probably the hardest part at this point because because the linings in there you can't really get to that part all right, almost there guys it's gonna give us a good pressing on the edge and top stitch and then we'll be done with the bag grab my scissors, because as I'm pressing, I'm seeing a lot of little threads poking out here and there it's a good time to catch those. All right? I think we're ready to top stitch and I'm going to change my thread one more time because I want to use the white tops to check around the top edge, so just do that real quick. All right? So for this top stitch again, I'm gonna set my stitch length to three, and I'm going to stitch about a quarter of an inch from that top edge just give it a little breathing space again, and you'll be your your handle is stitched in the scene, but then you're also top stitching over the end of it could basically there's a half inch of it inside that scene with the seam allowance. So when you go across that, I'll just be another reinforcement of that strap on. This might get a little bulky on the side seams, and I'm pretty sure this machine can handle it. But if your machine is finicky about thicker seems this is probably that they was part of this bag where everything is coming together at the top of this side seem so I usually start not right down on top of that side team will start a little bit. Before that so you can kind of like ramp up. Um, what else do I want to say about that, I guess. And go slow. And, um, where protective eyewear. Oh, I know it was a walking foot I need. There was everything. If you have a walking foot for your machine and you, you feel like that would be helpful if it's a good time to use that. All right, we have a bag, you guys. So here it is told, done. And we've got, um, our magnetic snapped her handles full lining pocket that, uh, so I hope that after you give your bag final press and trim all the threads and that you're really proud of what you made and enjoy using it. And I think if you want to make another one fairly soon, that wouldn't be a bad idea just to kind of reinforce what you've learned. And I think that, you know, you're ready to take on something with a little extra detail. So I hope you enjoyed the class.
Class Materials
Bonus Materials with Purchase
Ratings and Reviews
Lynnette Simpson
5 stars +++++ I thoroughly enjoyed the whole course. I found that these classes gave me the understanding and confidence of sewing 'any' tote with both a slip and zipper pocket, etc. After watching these classes of Betz I'm able to put together my own tote without having to refer to patterns or instructions. I started as a beginner not able to figure my own dimensions. Now I have confidence to do just that. Yes, very happy I purchased this class and am happy with the confidence it has given me. Thanks Betz and creative live Cheers Lynnette
user-d19582
I enjoyed this class very much. Great class for the beginner who wants to fine tune their techniques. The instructor is very knowledgable and guides you through the ins and outs of making a better bag. I am looking forward to her next class, I believe it airs the end of January. Thank you Betz
a Creativelive Student
Betz is organized, pleasant, and interesting. I am enjoying her courses. I watched a free preview, and that sold me on getting all of her classes. Love you, Betz!