Lessons
Day 1
1Getting Started in Boudoir
40:06 2The Stages of Learning
41:43 3What’s In My Camera Bag: Boudoir Edition
52:28 4A NYC Boudoir Studio Tour
29:23 5How to Prepare for a Boudoir Shoot
31:12 6Interview with Hair and Make-Up Artists
36:17 7Styling and Wardrobe Choices for Boudoir
36:44How to Style and Pick Wardrobe for Boudoir
25:32 9Key Foundations for Boudoir Posing
1:14:05 10Posing for Boudoir: The Rotisserie Chicken
43:39 11Posing for Boudoir: The Solar System
19:38 12Posing for Boudoir: Top Selling Shots
57:09 13Shooting Boudoir: Using Light to Create Interest
1:00:21 14How to Shoot Boudoir in a Hotel Room
41:18 15Image Post Processing for Boudoir
54:05 16Final Edits for Boudoir
21:42 17Album Design for Boudoir
34:15 18Pricing for Boudoir: Shoot & Burn/Packages
37:24 19Pricing for Boudoir: A La Carte
26:53 20Pricing for Boudoir: Name Your Own Price
45:02 21Pricing for Boudoir: Calculating Your Own Price
49:21 22Boudoir Critique
39:48 23Boudoir Boot Camp Wrap Up
48:52Day 2
Day 3
Day 4
Day 5
Day 6
Day 7
Day 8
Day 9
Day 10
Day 11
Day 12
Day 13
Day 14
Day 15
Lesson Info
Final Edits for Boudoir
We've already talked about, um, choosing images for your client to see how they choose their images on dh. Now, what do we do with them? We had a couple of questions. We just had lunch. So we had a couple questions at lunch about raquel. You asked me a question. Do you remember what I was just looking at me? Like, I don't remember what it was about. Okay, brian asked me if you remember it. Okay? Whether after they have chosen the images for the album, whether you then go back and show them all the images to see if they want to buy individual from from that is that you ask me. Okay, so typically they will buy images from the images they've already chosen from the album versus like picking a different image. The only time they will pick a different images if they want to buy an album within a certain number of photos. But they like more photos on that so they might buy those extra ones in prince, which is okay with me. They may get the album and go. You know what? I just love this one so...
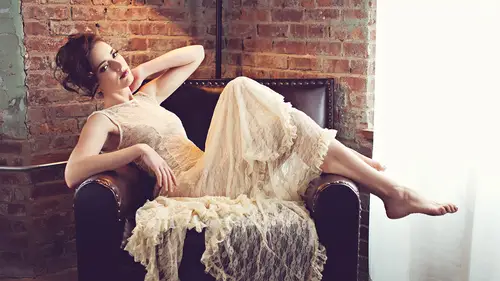
much. I want to blow it up, so can you do it so it might come later, but I do present them with that image pricing. Faras prince or concern award is concerned once I give them the album pricing as well. That's when I present them with the wall art pricing so they might look at it and say, oh, you know what? I just love this one so much I wanted in the album and a print or or but they can only the way I've set it up is really the only order if they've already ordered an album already in love with all their pictures that they just get it in addition to take your album. Thank you. Okay, so I called up an example of a photo like I said, that I have just taken out of light room, and I'm gonna show you a little bit about how I added it. The only thing I hate more than editing is editing in front of other people. So you guys have a little patience with me. I am I really do believe my load of editing and my inexperience with photo shop and light room really has pushed me to be a better photographer. So if you don't have a lot of experience editing it's, okay, I am self taught in this area. Well which is probably a really bad thing because there's so many cool things that photo shop could do that I don't know how to do so I really broken it down it made it really really simple so please make sure you ask me questions along the way if it does in any sense to you um this is a really simple image it was daylight um so it's really clean but there's a couple of things about it that are making me crazy first of all we're going to go in and first liquefy that area that I showed you guys in the last segment um right under here this is something posing can't really help maybe I could have brought her lingerie up a little tiny bit and help that but because I didn't I'm just going to try to liquefy it a tiny little bit I'm not going to make it like super crazy flat like it still has to look normal and believable right? So I'm not gonna I'm not gonna make it look unbelievable and maybe I would liquefy down here a little bit but I'm not going to right now maybe it's smidge right here um that's it and when I liquefy I just sent my um brush pressure on fifty percent and I just changed my brush and that's really all I d'oh I'm not that fancy I don't know how to do anything else this is all I do so I really make it nice and easy, okay? So I'm just gonna press, ok? And you take a photo so you can see this is the before this is the after tiny little thing, right? Okay, so I'm going to go into actions, and so I have my own actions, and this is the first time I really ever showing them to anybody, and I may make them about well, I'm not sure yet I haven't decided you're going to tell me what you think about it. You're my beta testers right now, but the reason I have my own actions is because I really do such a small amount of work on the images. I do the same thing over and over and over and over again. So I finally went to a friend and said, hey, listen, you know more about photo shop, but I do can you make these for me? Because I don't want to bug myself down with the five hundred different steps and you know, things that I don't really know how to do and maybe mess it up because I don't want this to take a whole lot of time. So I've created these actions to sort of help my work for these are the things I do over and over again so first I'm going to go into um I'm gonna go to full retouch eight but I'm just gonna press play and it's going to create a couple of layers for me one of the layers that I'm looking at is the, um and these are going to be down here this is kind of tight I can't move that right? We're going to go down here um there's dodging burn, blemish removal, lighten under eye and I want to do that I want to lighten under her eyes this is really easy I'm just gonna click on lighten under eye and I'm going to go to my paintbrush I'm gonna blow the picture up a little bit here I'm gonna make my brush smaller and I'm just going to sample our color from somewhere else on her face and I'm just gonna go under her eye with that color do you see that? I'm not at full it's very slight. I know it's hard to see on here um let me show you I'm going to do it again I'm gonna undo it, I'll do it at one hundred percent of pass today, so you see maybe I'll pick a lighter place, I'll just show you what it's doing it's still pretty life. Do you see that? Like, if I went over the black of pride, you see how it's lightning it? Okay, well, I'm not gonna do that, but I'm gonna drop the opacity a little bit. Just sampling and I'm just going under her eye a little bit. This is the way to lighten under the eyes without having to get rid of the eyelid. Okay? And it's, just really slate. I mean, I don't want to go crazy here, and I don't want to darken. I don't want a latent like her eyelashes and all that, but I'm just going a little bit and maybe what I'll do is I'll hell in here. You know what? I'm on the wrong wire. Sorry. See? Look at me. I'm gonna go to blemish your mobile and I'm gonna make sure that it's sampling from current and below this is a different layer. There we go. And so the reason why we do it on different layers could we're just kind of building up, so if I screw up her blemish removal and I don't have to worry that I liken reverse that or I can take that off without losing the un dry lightning. Makes sense, so I'm gonna even though this isn't technically apply mission just gonna lighten and we're just gonna try to get rid of that and they're a little bit you see, I'm not I'm not ruining her under I'm not losing her under I does that make sense and I'm going to do it so it's actually need er and it doesn't look terrible do it really fast. I think I could shoot talk away, you can edit and talk wrong layer you just have to make sure you're on the right layers. It makes it pretty easy, but I'm not I don't want to like I said, I don't want to lose that under I'll did. I think that that's really important to have. Okay? And so what I'll do here also is I'll get rid of some of these little blemishes. I'm just using the hell tool on this layer, okay? And I'm just sampling from below, and I'm just getting rid of some of these small blemish is that she has. She really doesn't have managed to get some really beautiful skin. Okay, so I'm gonna take another picture hoops and says where we're at, so this is where we started. This is where do you see now under her eyes? Lauren like I said, no you're saying you didn't see before but you see under her eyes there and there it's a big difference but we haven't lost her under eyelid she's not flat in the face right? We still have some some connection there the other thing that's bothering me is, um I don't like under her armpits so I'm really more so it is she has a couple stretch marks on her arm so let's go teo skin airbrushing and we're gonna go back to the paint brush and I'm gonna go I'm gonna raise my opacity and I'm gonna just kind of brushed on here a little bit it's very, very slight because we've already run her through portraiture but this is a place that you can kind of give a little bit extra for the certain places you need it like maybe they're far ahead sometimes need a little tiny bit of airbrushing on their little more skin touching a little tiny bit okay, nothing crazy just picking a couple places you could see where you've hit it by pressing your little slash you could see where you've been the airbrushing so you know and you can change your past today so you can like gradually do it for me, I don't feel like that much e I don't need that much here um all right, so what I'm gonna do is I'm going teo say layer and I am going to know where's my flat out here, I'm gonna merge visible, okay, so now that all layers come together and this is what I say, hey, there's, a couple of other things that, um a little something actually bothers me about this image is really the dark parts, okay, this happens also its hand lines because it's hanline problems out of skin discoloration lot of darker hands alley at you and I were talking about that, like, hands it get really purple or red or feet get purple and red is a lot of that and what we d'oh um so I'm gonna go backto actions and I'm going to go to frequency separation and I'm going to run that just good price, okay, there's a lot of talk about frequency separation I do not know how to do it, so I said, create me an action that does it okay, we were talking also at the break that, like, you know, the late room, all the conversations I would say I don't know, greg, you explain it. The truth is I'm not an expert on everything, I can't be an expert in everything, so I really have this community of people around me that helped me with things, so going forward, I know if I have a question, I could go to greg and he'll answer for me, and if he is a question for me about sales or whatever, I'll help answered for him that's what photography community is about, um, you know, I have ah, really good friend named benny that helps me with my gear and I'll be like, you know, I don't understand how to hook up this soft box and I don't want to make myself sound stupid, but I just can't be an expert in everything there's some things you just don't do over and over again that you need help with, um and so find people that can help you and find people you can help also. So it's a reverse situation, so I don't know how to do frequency separation. I've read manuals I've seen tutorials it's over my head every single time I do it, so I asked my friend to create me this action, so this is what we're going to do, and this is what he did for me and he created this tone painting left layer layer what's nice about this is you can actually paint on tone without losing the detail, that's losing the details what most people missed in editing, they just cover it up and they lose the detail and that's where we start getting like, no skin texture, we start losing decreases in the bodies and they just start looking flat in plastic. So again, I'm just going tio sample from somewhere by pressing option and I'm gonna lower this opacity quite a bit here, actually and let's see what that looks like again, I don't know what it's gonna look like, everybody skin tone is different, so I'm just going to start doing it and I'll go from there if it doesn't work now, I'm actually gonna lighten up this area a little bit, and that helps with those, um, stretch marks as well. Okay, I'm gonna do the same thing in here and I'm just going to kind of lighten it up just a little bit, okay? I didn't lose all the darkness. Um and I'm okay with that. Actually, I'm going to go back. I'm going full at this for once, and I'm gonna go back to filter liquefied. I just know I want to look up by this little thing right here, that's it tiny little bit, but just start just enough, right? So again, here's, where we started and here's where we're at now okay, small changes us. I'm all about the small changes, right? Imposing we did a lot of small changes for big impact here. It's the same thing. Um I'm going to go back. I'm going to use my clone tool and I'm gonna make sure it's on normal and I'm going tio let's see what happens if I try to take this thing out? I feel like it's just drafting me and I don't like it, so I'm just going to take it out and then I'm going to hell over here. It's a small little something it's not necessary to do necessarily I'm really doing this task this is bad looking really bad but you get the idea this is how I would do it just clone it out he'll it so the shadows the grading is right and so that's what it looks like without it that's what looks like with it it's just that it just bothers me there I just feel like it's less of a distraction without a tiny little thing. I don't take out every single distraction in every single picture, but you notice that we've said all the time when I'm shooting and I'm showing you my images that they're all very clean there's not a lot of distractions, so I do I take out things like electrical outlets things that are and usually not even always, but usually I take them out just those kind of things don't add anything to your image. It didn't necessarily take away either, but I just felt like in my mind it was distracting because it was white and it was kind of forcing my eye to go to the corner. I don't want that I want my high to go to her face and her body. Um all right, so we're good with that, I'm going to go back and I am going to use clarity. I'm gonna press play and you'll see it'll just kind of bump up those blacks. I love black blacks, all right? So again, I'm gonna go back. I know that there's an easier way to do this, greg, you'll show me one day, but this is how I do it. This is thie starting image, and then this is the basically the final image, okay? I'm not doing anything groundbreaking, but I am making like for me, the black around her eyes is so important that wing I like, I don't want to lose that for me. The blacks give the depth in the picture, you know, we've already dealt with the exposure we've dealt with the color balance now I want to make sure my blacks are like true blacks and I mean allah you talk about this when you talk about like my skin tones and one night my pictures you said to me once I really love your skin tones in all your pictures for me the blacks are part of that it's like you know I want to make sure that I'm getting that pop so the clarity for me is very important all right I'm gonna flatten this again and basically what I would do is save it at this point as a psd and then I'll save a copies of j peg also so if I want to start putting in the album I can do that so I'm going to save it right now I'm just going to save it is the ps city and then I have a couple of fun little actions here also like retro black white film there's a million actions out there that do this stuff I happen to like a lot of different kinds of actions but typically would all do is I will show my clients they're photos in color all in color and if they say to me I want black and white then I'll put it in black and white or all experiment with a couple of images in black and white or sometimes they come into the session right away and they say oh my god I love black and white we do our whole thing a black and white and I as much as they love it, I still show them all the color pictures because, like, for me, this picture is like, oh, I just love it like that red lips take the color of her skin. I have a serious addiction to my color images, but I know women sometimes want black and white images so I might take a handful and and convert them to black and white and show her in the album some samples, or maybe I'll just show her the pictures and go, okay, which one do you like black and white or color? Better? Or sometimes during the sale session, I'll just pick a preset in light room and show her with something might look like in black and white, like I'll say, you know what? I don't use this, so it'll be a little different, but here's an idea what something looks like a black and white, but I have to say, most of the work that I do is in color. I just I don't know there's something about, like there's, like I said, their skin tone and but I think that this picture would probably look nice blacken my too, but I don't know so let's say we're going to play around with it a little I think I did retro one I tried right well first I'm gonna take a snapshot of this snapshot six because I want to make sure I could go back to it although I've already saved it so I compress revert if I don't like something but I'm just gonna play this and see so this is the full action um I don't like it so dark but I will drop the opacity to about I don't know let's say I think it around thirty percent we start seeing some changes and I kind of like that so I might show her that is an option also in the album but here's the thing if I'm going to change this one image this way I'm going to change all of the images from the section this way so it's consistent I don't like seeing like color and then you know a different color in a different color it just makes it look kind of crazy so if I'm going to change it to something I'm going to make sure I save all of them that way this way it's consistent yet lauren so I understand that you want the album to be similar how do you feel about like the overall branding for your actual like all your photos do you stick to just a few of the actions or like how how important is it to be consistent there that's really up to you it's not important it's a matter of being consistent per client but I think you're going to find as you go on shooting that you're going to just fall into a certain place that you love either you love a retro look or you don't or you love color or you love black and white you're going to find your own style and you will find any type of editing that goes along with that just like we try to find our photography style you need to find your editing style I think for me I'm able to teach this editing because it's clean and it's simple and that's based off of everything else I'm teaching you deposing and everything else but it doesn't mean you're all going to end it this way, you know and that's ok too I think like jolene and I have a very different editing though you know um ali, I think this will probably work a little bit more with what you're doing because you you have like the nice bright colors your studio is kind of simple like mine like very look white walls and lots of natural daylight I find when I edit with straw and I shoot with strobes it's a completely different at it so your light depends it depends on your light depends on your location depends on your client's skin tone it depends yesterday I'm going to be really frank we put we took some of your pictures and put them in black and white because the carpet was so ugly, I couldn't stand the color of it, and I was like, warren, I'm just moving it's a black and white and that's it, and we don't have to worry about it ever again, and it worked, and thankfully it worked for the photos, you know, not that they didn't look good in color, but I know they didn't look good in color. I didn't like how they look, so I change them to black and white, and I was honest with you about it, right? So sometimes you just have to do what you have to dio um, okay, so I like, I like this look on her let's see what would happen if we did do I don't know what the with these black and white you're gonna look like off the top of my head, you know, it's just kind of hot black and white too, you know, maybe I would bump up the blacks a little bit, I would go to levels. No, you're going the wrong way. I don't know, seeing greg, I don't know what I'm doing, but you get the idea. Just play around lauren, you know, especially if you're learning, like I always say even the people that made photo shop don't know how to use photo shop because there's so many different ways to do everything and they're always changing it and upgrading and that's why? For me I find actions are simple and they're good they're good for me because I have recipes I use a little bit of this a little bit of that here's my recipe and I know just like posing when I say okay, I know that if I crossed a girl's leg over the other one it's gonna make her thighs look summer I know a girl who's wearing black who has a more honey skin tone will look good with this recipe. You start seeing patterns over and over again so, um and write it down don't be afraid to write it down like sometimes in her folder all write down the recipe I used to edit them so if I see another girl that is similar and skin tone I go oh, you know who was like that? Ah, you know the girl that I shot two weeks go, let me go in her folder and see what recipe I used for her, so that makes it easier this is also good if you outsource editing now one thing I didn't mention when I talked about calling and going through the images for my clients is that there are times where I am so busy and I can't do it or I know that I'm traveling and they need somebody to do it while I'm gone so I'll send my editing out um this is true for my color correction my calling I'll send it to shoot dot at it and you could you guys confined them to shoot dot at it dot com but it's really shoot dot at it spelled out uh shoots out at it I will send them my pictures and I will say call it to this many photos color correct them for me and send them back and so that's a really good time for me like joanie and sometimes you say you're backed up with twenty clients um not anymore now that the old days in the holding the whole days but let's just say you are backed up cindy and you know you are backed up, you have all these clients and you you're like I just ordered let's just say you don't even like it maybe you don't even like calling erin maybe you're like, you know what? I'm spending an hour doing it I don't want to do it anymore I'm going to send it out for somebody else to do it it's it's inexpensive and they're really wonderful over there so you might want to check that out so shoot at it uh I'm actually working with shoots out edit to do this type of final edit for me as well were going to kind of create a program coming up this year form or portrait style edits because they do a lot of wedding work right now as far as like they're quick kind of at it and I basically said some I need more than that I hate editing helped me so I'm going to help them come up with a more portrait based editing type system to do things like this a more creative type at it so stay tuned for that but you know outsourcing this stuff any type of editing is it is also a good idea if you can find somebody that you trust and you know I've had it done in house I've had it sent out but it depends in any time I have time to do what I do it myself but these are also things you need to think about when you think about the cost of your sessions you know building into um yeah so she says to me she looks really nice and black and white also um so maybe I would show her both options or maybe I would just take one and make it black and white to make that like a single image spread and then everything else will be in color. I don't put any color and black and white on the same page that makes me and saying to I think just even in the printing process, it's all wrong, it's not right to do that to the printers. Um, so this is this is where I would go with that, and then that's really it that's really kind of it, it's very, very simple. And now it's taken me a long time to do it because I'm talking to you guys, but in actuality, I can probably do all of this in about a minute to minute and a half per image. All right, so if you're talking about you know, you're editing, you're giving a full edit for thirty images you're talking about another half an hour, forty five minutes is to edit for that it's really not that long, and also usually the the first image chase the longest because you have to kind of develop the recipe for that person. But then after that, you know what you're going to do, and you kind of fly through it. You know exactly what parts need to be liquified, you know exactly where you need to go with everything, all her armpits are dark. So I know I need to do that or her, you know, so you get the idea, but, you know, the liquefied button, you see, you guys, I don't use it that much like that was actually pretty extreme example of how it would use it. That was a lot of liquefied for may think posing is really important for that, because I don't want to spend my whole time sucking it in, you know, and then especially my studio, where I have all those lines everywhere. Try liquefying when you have lot every lines everywhere, and you have to keep the lines straight, and you have to move the body. It's a nightmare, it's, a nightmare, so let's, just make it so we don't need to be on top of the computers that we need to be on top of the posing and taking more time that way.
Class Materials
bonus material with purchase
Ratings and Reviews
sean
I think this course is great, my question was about a Facebook comment made that if a man has a bunch of likes that are female pages..., I agree and disagree in marketing they thought me to like your interest and hopefully future clients. How do I make it safe for clients and future clients? I am a Talent Agent and use to model and learning Boudior is my way of helping my models and business ,I want to also produce a magazine from my agency ,I was going to buy both franchises years ago but I want to do it myself in one company so I'm learning boudior photography to help me a beginning photographer pose women something I do not know I still pose women like family photos. The courses in green screen and other photo classes are just about lighting and position not what position, as a Videographer same thing no posing skill, business video production doesn't teach it all my courses are pro-stuff and tech nothing about what poses my models do. This will help my Video Production Business and Photography Business and my Model Agency...., thanks! I need this course so my models are comfortable and my clients feel comfortable I'm a shy person and I don't want me being uncomfortable make everyone feel weird!
Daniella Moné
Thank you Jen great Bootcamp! I'm starting my boudoir photography business and you have given me so many tools to succeed. I would have like to see more of the why in the posing as opposed to I don't like this let's change it as posing is the biggest challenge for me. I was particularly happy to see how you use your TD6 to create window light. That's what I use since my studio windows are too high when the client is laying on the bed. I really enjoyed your hidden gem video as well as the male versus female. You are an amazing teacher, thank you for your generosity!
Student Work
Related Classes
Glamour & Beauty