Lessons
Day 1
1Class Introduction
13:30 2Why Composite ?
15:25 3Logic Checklist
24:20 4What Not To Do When Compositing
08:46 5Shooting for Composite
08:57 6Changing Backgrounds and Light
28:12 7Shoot: Simple Swaps Part 1
29:22Shoot: Simple Swaps Part 2
23:54 9Practical Ways of Lighting for Composite
18:54 10Shoot: Matching & Creating Consistent Light Part 1
25:42 11Shoot: Matching & Creating Consistent Light Part 2
15:42 12Shoot: Stock for Composites
23:53 13Basic Photoshop Tools for Compositing Part 1
20:15 14Basic Photoshop Tools for Compositing Part 2
25:37 15Compositing Simple Swaps and Group Shots in Photoshop
32:57 16Lighting in Photoshop
22:27 17Gradients
12:53 18Vignettes and Lighting Effects
16:13 19Compositing Clouds
09:18 20How to Create Shadows
07:35 21Removing Subjects from Backgrounds
29:52 22Shoot: Comparing Backgrounds, Light, and Angles
33:35 23Compositing Backgrounds: Blending & Background Eraser
29:02 24Composting Backgrounds: Refine Edge
36:52 25Compositing Backgrounds: Blending Modes
19:57 26Creating a Levitation Image
27:20 27Shoot: Levitation Poses
34:35 28Shoot: Creating a Dress
13:00 29Levitation Examples
21:53 30Editing Levitation Shoot
44:36 31Building a Dress in Photoshop
22:24 32Dollhouse Shoot Overview
21:11 33Dollhouse Shoot: Model in Water
34:23 34Dollhouse Shoot: Book Pages and Dollhouse
15:11 35Editing Dollhouse Shoot Part 1
28:26 36Editing Dollhouse Shoot Part 2
20:22 37Editing Dollhouse Shoot Part 3
25:20 38Photoshop Critique
10:15 39Marketing and Selling Composited Images Part 1
27:49 40Marketing and Selling Composited Images Part 2
23:58 41Process of Creating a Composited Book Cover
19:04Day 2
Day 3
Lesson Info
Changing Backgrounds and Light
so I'm going to move on from this one though let's talk about changing backgrounds I have ah well this is too easy but can you tell who wasn't really there well it's my aunt debbie there yeah you know she couldn't make it to the shoot if we're doing this big family thing every year I go home I visit my family and I forced them to make t shirts they hate it I don't know I mean really they're like so non enthusiastic about these holidays and stuff and so I make them make t shirts and I made my sister's that's an evil bear there with a christmas tree body anyways my aunt couldn't be there obviously we wanted her in the family photo these are her two kids so she had to be there and so I photographed her on a different background different day ah same whiting major the light was the same major all of that was going to work but what I didn't take into account was the pose so we ended up going for this kind like fun you know we're cool family pose and then she's just like this and to this sta...
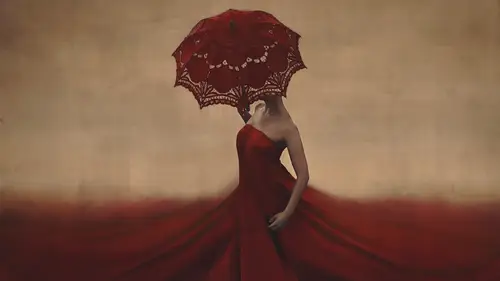
ge this was two years ago and she's still like brooke that picture you should have done something different on it like I know so I regret that and that is something that I would change next time so giving the picture atmosphere that is one of the reasons why I would move somebody to a different background that is what I did in both of these instances and in this case I was unable to shoot somebody in that location that was alaska I was not getting in that water I mean it's not gonna happen not to mention I can't walk on water so that's also a problem so I went ahead and I moved each of these subjects to a new background I know that's a really creepy picture okay so way have the before picture in my bedroom just on a white wall simple simple I did that because I loved the direction of the light that was coming through the window it's soft yet I could make it more dynamic leader if I wanted to okay no more head and then we have an armed all right so that's we're just skipping right past that we don't need to talk about that at length and uh let's see so now I'm going to move myself so here is the backdrop that I chose did the backdrop look like that to begin with know I mean what what is this nothing looks like that in the background of anything well not in my life it's way more complicated than that there was a mountain right there so I just painted that out chose this color because I felt like it was a really neutral background that I could work with dis saturated everything because that's very pink I didn't want my skin to be very pink to match it so I made it match my skin then popped myself right in there so I put myself in there and what I loved about it was the light on my body I started to change the light on the rocks a little bit so then that would match a little bit better than it had more of a direction and this is my lawyer mask of just cutting myself out so I just used a wire mask for that yeah that that's how my head looks all the time it's like a little war I don't know what that is but okay so I started adding a few clouds in the background really really subtle started changing the whiting on those rocks and then yeah rocks do you do it mostly just well like the burning dodge to know that's a great way of doing it uh just by selecting and frightening mostly so I would just select a little area right not up and that's what I did for this and I continued to do that on individual rocks so in general on this I wasn't just lassoing the whole thing and thing that needs to be brighter because it didn't what needed to be brighter were very specific points of these rocks then it looked like the light was coming from a certain direction is where you I knew that you wanted it to look like this all in the end or did you pull a stock image and put it together this wass I knew that I wanted to move my body to a background that was very rugged I didn't know what that background would be yet so I didn't know that it would be all those rocks if I thought it might be a couple of rocks around because I wanted to sort of look like a organic figure coming from the earth sort of so s so I ended up I guess like a week after this I photographed this scene with somebody else in it and then I got a blank shot up it just in case and then I was able to use that and I was thinking about it because I shot it really low like level with the rocks just the same as the angle to my body so I thought it would work out really well so for this one I started building so this was the entire frame and that was the first picture that I started with now I shot this at like noon it was like hi son not good lighting but the great thing about lighting like this if you're looking in a flat object it's kind of okay because you could just dull the exposure down so instead of the light being directional say at two p m where it's kind of like really harshly hitting somebody I was just photographing the flat lake in the mountains in the background which meant that the whole thing was kind of flat so when I put this all together and I start stitching this you can see that it's still kind of looks like it's bright you can kind of tell but it's noon but I think in the final picture you can't tell it all at least I mean that was my goal so when they're reversing this picture and I ended up to saturating at a little bit and doling it down now I don't fit there like it doesn't look right yet I just that was the initial cut out I photographed myself at my house after the fact I then put myself in this background that I shot this background for this image so I knew where to focus I knew where I wanted my body to be in all of that but then I started adding dress on so I did this all on my house still just photographing that fabric trying to put it on there okay and then we have this edition of the clouds and that's what really helps this picture so if I take just one step back also the hair the hair is a really important part dio but here it's still I would say that now we've achieved this sort of overcast look with the whiting but then when you see clouds come and you don't even question it you're just like well maybe you d'oh just tell me because honestly you won't offend me but but I look at this and I say oh there are clouds of must be stormy like it just that's just how I think so because of doing the light and adding those clouds and it kind of worked out all right and then I faded that dress because I didn't want there to be a harsh line on the dress it was kind of awkward looking and I didn't want to create shadows and stuff so I just faded it into the water and then ended there okay we're looking for angle are you looking for a type of texture when you're shooting those kinds of scenes are you looking for something in the center that matches yeah you're doing kind of so in terms of focal point or I'm noticing that you the scenes that you're shooting have a smooth center textures that intentional is that kind of I would say you need to you need to go back mr presentation I'm not doing that it has a life of its own so in terms of right here I focused right where I was standing essentially and I made sure that it was a blank enough space I guess to answer your questions so eso like I would never have I have like made myself stand over here if I wanted to blend into where it was sort of non chunky monkey I know this has gotten into you two have been sort of a strange place talking about chunky nous but yeah so so yeah so yeah I do look for that I look for a nice blank space I look for a spot where I can fit without having to worry about having one leg up on a rock there are something like that but I don't know if that answers your question does mummy and one other person when we were looking at the image with the flowers flying that you shot under the bridge or in the sewer says when shooting the flowers what backgrounds where they shot on or do you have to cut them out yeah some of it was cutting so let me actually let me step back to that because that's an interesting one to talk about in relation to this and something that is very relevant to talk about now so oh that was a while ago her time flies huh they're okay so some of them I didn't have to cut out at all and that was awesome because they were just on black over here so where they're not intersecting my body that was great because I shot them on location I shot them with a dark background I shot them just the same way that I shot my own body so if I go back I wish that I had a couple photos of that exactly what it looked like there so it was just shot on the dark part here I might have moved him out a little bit I definitely shot them closer to the camera not something that will be talking about later as well which is that I don't like to shoot small objects far away from the camera for fear that I'll need to make it bigger and I don't ever want to stretch something so I shot it closer to the camera with a darker background and that made it a little bit simpler too because the background was then blurry because it was so close to my camera so that I could more easily cut it out there was more separation but in that case that's what I did I ended up re using some of the flowers so you know I had a couple of these like this one's cut out and you can see that here I cut that one out because that ends up getting moved somewhere else so some of them a lot of them ended up having to be cut out anyways which was kind of a pain but the ones that are on the black certainly do not need to be and that's how I tried to shoot where I try to move the object to where it's actually going to be in the shot that way if I don't have to cut it out awesome and if I do then at least it's on a dark background then it'll be easier to dio tastic let's actually you know what I would kind of want to dio I just wantto go through and you can say yes or no I'm gonna be talking about this later on in the course or I'm not kathy seed you have a favorite tool for separating parts of the image for use in your composites yes yes we'll be talking about that perfect let's see how does she cut hair out of the background yes gonna be talked on that let's see sounds like brooke doesn't save layered photoshopped files to noodle with her composites more later is that so let me talk about that now because I was just thinking it sounds like I don't know how to edit but let me e so I would say up until about a year and a half ago or two years ago I would merge my layers at the end but never flatten so I've never okay except for my first year of photography I would never just flatten everything I would duplicate emerge my layers that way I have them all there but once I've merged them and I start making changes to that merge layer that I'm very hesitant to go back and do something else to the other one so I do that sometimes however three weeks ago I discovered a new technique for not having to do that and so very excited to share that with you guys probably like obviously brooke but a so I'm excited but yeah so we'll talk more about that but I do keep my layers separate as much as possible let's see uh you do so many questions coming I love the way you guys were asking these are so great photo maker and for others going back to the shot that you use the footstep in the sand they were wondering is the footsteps sand shot done with a macro lens and is that a case where different focal length subjects in a composite can work yeah so it was not it was all shot I believe with a fifty millimeter so it was a good in between lens the problem with it was that that footprint curved toward the camera a little bit so there were it was almost like a round thing like a canyon that was created because of the footstep so that a lot of it was blurred and that was a problem like the stuff coming toward the camera was blurred so that was a case of having to get rid of that front rim of the footstep in my picture because that was in in the image when I composited it so I had to get rid of that and it's the kind of thing where I don't know so much about changing lenses for that I'm sure it could work but at the same time like taking my f stop up would have been great for that just tow have a little bit less you know blur on the image that would have been really nice but there was almost no light left in the sky so I didn't have many options there and the good thing was I had to blow the whole thing eventually anyway so I didn't worry too much but yeah that that's something that given better circumstances I could have photographed a little bit nicer I guess great another one from b with a bob you know what that means but I think we should all be with a bub you're the bob will she talk about color shifting you talk about the kind of color treatments that you d'oh absolutely at great length okay so we are going to shoot the segment but we're also going to continue the presentation that we had going on before because I was making my presentation and then I thought this presentation is one hundred sixty slides and that's probably way too long to fit into an hour so we're going to continue with that right now just talking a little bit more about image compositing and showing some examples and I want to do that because I want to get through all of the foundation really quick before we pick up a camera I I tend to like to study things a lot before I actually go do it just so that I feel really confident that when I pick up the camera it's going to be for a good cause so let's talk a little bit about this image then so this images that the start here of how it began and this is the after what I'm showing here is how I shot this image I shot myself with no background in mind yet like I had I wasn't sure of where I was going to find the background what it was going to look like exactly I just knew that I wanted it to be really really neutral I wanted to have a really blank space and I didn't know what that was going to be so I shot myself and then I went looking for a background where I fit into the background in terms of the height of the camera angle and stuff like that I did have to distort the image just slightly the background image to make the perspective fit a little bit more but it generally came together as long as I was toward the front of the frame so I shot this image just like this it was started with just a white canvas I opened up photoshopped created a six thousand by six thousand pixel white canvas and then I started putting these book pages in now these book pages were actually what inspired me to create this image because I shot these book pages three years ago when my mom came and visited me and I did a picture with her and there were these book pages coming out of her head neither one of us really like to the picture that much and so I wanted to end it I wanted to use this simple composition of those book pages had to figure out how so I put him in this location put them on this foggy background I'd shot this ages ago is well I had that already I matched them up the angle worked pretty nicely here and then I started adding some books and the reason why I started with the books and not my body was simply because I wanted to make sure that the books actually fit that I didn't have to go reshoot the books or anything like that so I put the books in and they they looked like they were believably sitting on the ground well enough but of course shading isn't happening here so I needed to shade the books to make them actually work so that was when I put the rest of the books in I put my body in there and I cut my body out just with with away or mask I wasn't doing anything fancy with like selections and stuff like that just a layer mask for this because my body has solid lines solid lines thick lines and easy to cut against so that's what I did for that but I still had to add hair on so you can see that my hair is just kind of like chopped right there it's just cut that right off so add that on later I made sure to shoot that when I shot my body in the books and everything ok so that we've got some dress adding on and this is a really typical process s for me of building an image I think probably the most typical in terms of I have the shot that is the pose and then I start adding things on the dress more books and some hair so how did that hair on I wanted to make it a little bit misty sort of to fit the background and then I continue died of books so I continued on with this and just blending the color blending light making sure that everything worked together and then I ended up at this final stage and this is something that we're going to talk about this image in particular a little bit more when we talk about cutting people from backgrounds and how to do that how to cut hair how to cut bodies howto cut books and whatever you might want to cut out so we have that for this picture okay so now I want to talk about something a little bit more fun which I mean nobody likes cutting so much but what I love is building a dress and creating a whole new atmosphere now in this case the point of shooting like this there was none it was an awful mistake what I was doing I was driving around and I was like okay where am I going to shoot this I I knew that I wanted white like a white sky from halfway up my body and above you wouldn't think that be so hard right to find like a wedge or something where there sky in the background and yet I something in my brain was not working and I couldn't figure out where to go I drove to many different locations so instead of having white in the background I have foliage and that does not work at all for what we're trying to do here I wanted it I wanted to be half color and half white in the final picture at a very specific vision for this so I shot it here it was kind of out of desperation I was like man I've been driving for an hour I don't know where to go I'm just going to do do with the whites leaving the sky if it doesn't work I'll do it again so I shot it like this and that's when I realized my problem not only do I have to put white in the background of this image but I have to put white in between every single hole in that umbrella how am I going to do that so I'm thinking okay well maybe I'll go in and you know at least I have a tablet so maybe I'll go in and color each individual section and and then I had this moment of uh replaced color so we'll talk about that later but basically I started to build I photographed the skirt in just laying on the ground many different positions and then I did that and in doing that that is replaced color so what I ended up doing was selecting the green color and in making all the greens of white and that so perfectly went in between each little bit of the umbrella and made that white so thankfully I did not have to color it in I mean I probably wouldn't have I probably would have just gone and reshot it if I would have had to do that so thankfully I didn't have to do that so there I just made the rest of it white just cleaned it up but the biggest problem with this image right now is that it looks crazy I'm all right it's like white like somebody has been cut and pasted that's what it looks like that's my problem with whites in images is that if you're doing a composite and it's already like you really need to blend it to look good and then you have just white in the background that makes it look cut and paste to me so I wanted to dull that white into a much more neutral sort of faded color that way it's more grey and it has a little bit more dimension to it it doesn't actually there's nothing in the foreground background no detail but going from white to grayken really really hoping image blend a lot more this is a very strange step in my process that really we shouldn't talk too much about but what it is is just the hell brush tool I love using the hell brush so I love using tools in sort of different ways so this is the hell brush tool just made to what painterly so I just little tiny he'll brush strokes all over that image until it all blended together and looked very painterly and then I started adding more fabric in not one hundred percent opacity but enough so that I could start building that dress and this was done first I took that fabric and I laid it all around the floor where I was and I shot that then I took the fabric and I held it up here and I just photograph the fabric moving out from my body many different times to create the stress and of course that was put on leader then I started the believability aspect I started putting some of the blew up in the sky and vice versa and then I got indecisive so I started going through colors and didn't know what to choose my initial thought was I want this to be a blue image I want to create lots and lots of blue and that's how I'm going teo that's what this is going to look like in the end but then I hit this red color and I said oh of course I'm want to use red and why not but the great thing about it is that my initial thought for this picture was it's going to be very calming it's going to be like a very serene image and then I thought no it's going to be a bloody image and we're goingto make it like life and death and administration and stuff like that which again we don't need to talk about that thing that was my thought process then less and so I started blending that color and and this is where it goes like if we keep it you know back here especially when it was kind of like that that's like it looks weird I mean there's nothing to make the whole thing cohesive but then we start blurring that edge in the background and that helps the transition between the two we start blurring that even more just bringing in more of a hayes in the background and then once we've gotten to the red stages where we're blending color really starts to come together I started adding texture and things like that softening the image up a little bit and that's how we ended up with the final image changing light changing light is something we're going to be doing in segment three and in that segment we're going to be talking about how to shoot for light changing as well as how to create motivated light and images so for this picture this started out with no clouds in the background or anything like that but I wanted to change the white in this initial image so it started like that the whiting on our subject was great for this it already had some backlighting this son was like over there I think at the time and so I ended up I saw this sort of rim light going on around her at least enough so that it could be coming from behind her a little bit so I ended up sort of capitalizing on that and how light the lily pads were in the background and I started building so I had my frame belt out and that was all good but then I needed to go ahead and change the background I thought for a while about keeping it the way that it wass but that's a really distracting background for me despite the fact that it's really blurry so I said I don't like it I have to change it what are we going to dio we go my goto what's going on with me just me and I started putting closet so the clouds now this is a tricky situation with clouds because I could have from this step cut around every single lily pad in the background and then had the sky sit behind that as a sky would but instead I decided to put it over top and just blend into a haze and that made it really really nice and easy for editing I did have to mask it off of my subject and make sure that it wasn't covering her but as far as the lily pads go I just made a hayes in the background and then blended it like that that allowed me to add some light back there so you can see the lily pads there just if I pop that on enough there's some light popping in the background there and there again so now we have the brightest part in the background of the image it's just a straight line across very much like that shot worth the sand dunes just creating that white line along the strip center of the picture where my subject is dis saturating and no this is going into part of my process that we will talk about later I almost always decide to rate my pictures first and then add color back in so you'll see contrast in color sort of pop into this picture now once we add that contrast we have dark clouds over here where that wasn't so apparent to me before I was looking at this and I wasn't thinking wow it's really dark on that side but once I start adding contrast that makes the darkness pop which makes the light look like it's motivated in this direction instead of from where the darkness is and that kind of makes the light on her face work a little bit better okay so now there are only a couple more things that I want to say and then we're just gonna jump right into shooting but in this case I want to talk about how important it is for shadow and light to make an image believable I'm not going to go through the process of these images yet but with the one over here with the girl reaching through into the room below this was I knew exactly the composition of this and and I knew exactly what I needed it to look like what I didn't know is exactly if it would come together so what I ended up doing was I had this room which have used many times in my composites is just a great blank room I had this room but the room didn't really have light in it it was very neutral there wasn't really a direction of white anything like that so that's kind of good for compositing like this because if I'm compositing with a dark space I can then add light back into it and that's really nice so photograph my subject laying there on the ground I got down on the ground with her she just sort of put her arm behind her and then laid on her side so that we wouldn't see her arm in this image so she laid on the ground that I made absolutely certain to pick an angle of her where the background was dark I wanted it to look like a spotlight on her like like we were seeing the subject in the background was very unimportant in this picture so I made sure to photograph her from that angle any other angle if I had turned any other direction it would have been too bright to really make it a lot darker so I made sure to get that background I then went ahead and I created a little bit of light on the floor just where her hands coming through as the light was filtering down through the hole where her hand wass and then from there started darkening other parts of the image so a lot of for me of white and shadow is about where should the light actually be in this case we don't have the option of checking like we can't say well let's just go find one of those rooms that's underneath the forests and see what the light looks like in there you can't do that so instead I had to imagine well okay if there's a room underground then there wouldn't be like coming in from the front because where would it be coming from so would have to come from that hole in the ground so I tried to make the rest a little bit darker and that spot a little bit brighter now for this image with the light and shadow that ended up being very important to the creation of this image I wanted the light of course to be a little bit ambient throughout the image I want in you know she's not like in a dark room necessarily but I wanted the light to come from inside the hole just a little bit so I started creating the outside edges of this whole made them a little bit brighter that way it looked like the white was wrapping around the hole that was being created there and with these pictures both of them when I was creating them and I hadn't changed the white I was really frustrated with both of them and I said this picture is never gonna work because the white looks really ridiculous but I just thought well change it as much as I can and then it starts to come together when we focus on that now this is an example of wardrobe which we haven't talked about it all and it's something that will kind of touch on as we go but for me I love choosing wardrobe that's really neutral and they're a couple of reasons for that one is just my style I just love a really simple look for my subjects I don't like anything too ornate but also this is all the same exact dress that I've used in all these pictures and just by changing color and making sure that I have a little bit of a more dynamic look to each one well then it doesn't really matter that it's the same dress so I can use the same wardrobe over and over and over again but the great thing is this is the actual color of the dress and how it looked before I chop the sleeves off is that the brighter the dress that you're using them or easily you can change the color of it so in all of these images I was able to very easily change the color of a dress and by fewer pieces of wardrobe because of that so that makes it really really nice and easy
Class Materials
bonus material with purchase
Ratings and Reviews
Logan Fox
I'm so thrilled to have come across this course and to have been introduced to Brooke Shaden. As a bit of background I do photography as a hobby, and always had an appetite to composite my work. It's only after watching this course that I can finally put a name to a craft that I love, that being 'fine art photography'. Through my own personal journey I've read various books, followed online tutorials both paid and free. When I came across this course I did hesitate. I wondered 'is it going to teach me anything new'... 'would the standard of the course be up to scratch'. Well, I can honestly say with hand on heart that this is by far is one of the best courses I've come across to date. As a solo photographer myself I've found it difficult at times to be both photographer and subject at the same time. From the outset what became clear was that Brooke is just like me in this respect which made the course so 'relevant' to what I do. Brooke shows throughout the course what can be achieved with a little planning and some creative approaches to situations that can be difficult to pull off when on your own. She is such a joy to watch and listen to, I loved her sense of humor and great how the audience were involved in some of the shoots. All I can say is, if you're in to photography and interested in compositing your work, you should give this a go, you wont regret it!
Totoo
I'd like to show my gratitude and gratefulness to Ms Shaden and other wonderful people at CreativeLIVE for sharing your vast knowledge without making a fuss. Not everybody has a super computer and a top-notch camera, not everyone has a studio to work in and not everyone needs to know everything as perfectly as some instructors and professionals do. I, for one, have gained so much insight and have been intrigued by Ms Shaden's present and past lessons, she makes the most difficult and surreal subjects unfold so easily and effortlessly. Ms Shaden has made me believe no matter where I be and no matter what i have, as long as i have a good story to tell, and the right vision, I should be able to handle it with a working camera and any version of Photoshop. Unlike many other instructors who kill us every 5 minutes to buy their flashes or gear and support this or that company and agency, Ms Shaden has spent the whole time teaching and teaching and teaching and I am sorry I cannot be there to thank you in person, but you, Ms Shaden, are awesome and nobody can unawesome you :)
SarinaGito
I have been a huge fan of Brooke's work since the beginning of the flickr days. I'm so excited to see her in her element on CL. So many years ago i was so very interested in learning and creating and CL makes this possible now. A lot of my work has been inspired by Brooke's dark yet beautiful work style and i am super inspired to create some using her advice. I cannot wait to delve deeper into this world i have been waiting so long to indulge in it and now i will even more so than i have the last 3 years. Thank you Brooke and CL ! =) Sarina Gito Photography ( www.sarinagito.com)