Retouching Workflow: Beauty Image
Lesson 15 from: The Art & Business of High-End RetouchingPratik Naik
Retouching Workflow: Beauty Image
Lesson 15 from: The Art & Business of High-End RetouchingPratik Naik
Lessons
Day 1
1Introduction and Pre-Shoot
19:30 2Shooting for Retouching: Beauty Look
27:52 3Shooting for Retouching: Beauty Continued
36:58 4Shooting for Retouching: Fashion
35:04 5Shooting for Retouching: Fashion Continued
27:47 6Shooting for Retouching: Male Fashion
23:13 7Culling for Retouching
16:47Annotating for the Retoucher
37:27 9The Retouching Industry
15:19 10What to Know Before You Get Started
27:07 11Tips for Retouchers & Gear
36:16Day 2
12Overview of Photoshop Workflow
37:29 13Photoshop Workflow Continued
43:34 14Retouching Workflow: Camera RAW
38:29 15Retouching Workflow: Beauty Image
30:31 16Retouching Workflow: Healing Brush
24:29 17Retouching Workflow: Content Aware
32:55 18Retouching Workflow: Dodge and Burn
31:08 19Retouching Workflow: Frequency Separation
31:03 20Retouching Workflow: Frequency Separation Continued
16:04 21Retouching Workflow: Color Correction
26:08Day 3
22Retouching Workflow: Contouring
34:56 23Retouching Workflow: Sharpening
17:39 24Retouching Workflow: Color Toning
28:54 25Retouching Workflow: Color Picker Table
20:24 26Conversion to Black and White
27:10 27Conversion Q&A
13:54 28Retouching Workflow: Luminosity Mask
14:31 29Retouching Workflow: Male Model
30:01 30Retouching Workflow: Male Model Continued
39:26 31Retouching Workflow: Fashion
28:39 32Working with Clients & the Business of Retouching
46:15Lesson Info
Retouching Workflow: Beauty Image
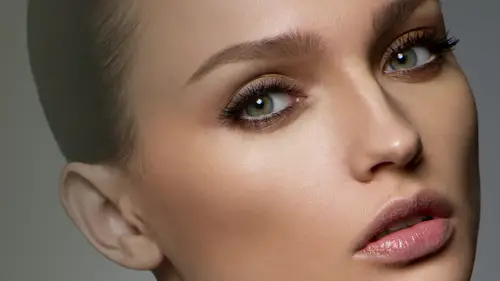
I'm going to go ahead and open a capture one and that's why? I wanted to go over camera off first kind of compensate for a lack of, um information that was going to be doing with capture one. Now what typically happens, we bring this up here is this is the essentially what we had yesterday. Um and I went ahead and made some selects from yesterday and what felix basically allowed me to do was kind of just pick the shots that you know we want to work with today with his notes in mind kind of give you general references on, uh, how he wanted to work now capture one again, you'll notice that with what felix did was a lot of clients who deal due on set is they will have their settings pre determined, just like we did yesterday liketo have these pre settings done and for clients is I like that he'll send those settings over to me, so he did just that he copy the files over with the capture one folder, which is automatic generates in the raw file in the raw folder and its army load everything...
he did. So anything he did over here, this calvin and stuff, you know, we're adjusted so the process would be similar if I was things from scratch, you know what have my exposure values here you gonna just exposure, you're contrast and so forth and so on you can adjust your damn it dynamic range so you can say you know what I think the shadows a little bit blown out here on you can essentially just raise your shadows and what happens is it brings mohr information into the chateau region, just like you wouldn't camera you see how they're very similar in the sense, it's just the way they render files there are a lot different now. Also included is you have your highlights later you can tone down your highlights and you can see when you see if I can the's beautiful hot spots get toned down considerably, but you know what? I want to make it hard for myself and keep them there so I can show you how I get rid of them, okay? All toned it down just a little bit, so it doesn't bother me as much. We're going to go in and say hi, take care of them. The second really cool thing about this is let me a little bit more is that over here on your levels it also does the same thing where you have input and output so you can change the shadow amount or where your black point ends and bring it up so you can see how it adjust the shadows on this side so concept is very similar in so many ways to go about the same thing is what I'm trying to say here so don't get bogged down in differences with programs and things like that the main importance is the whole work fool with that now let's say that like they mentioned um they don't like a particular skin tone this's where I love it when I get option two's capture one of my clients shoot through capture one is that I can go into skin tone and say all right I'm going to select the skin tone like so and it really find to air that it's lex and then I can basically just adjust it however I want I can change it from you know if I pull on the right side more green for example if I go the other side it's more red so I confined tweak it to the area that I want and secondly I can also expand the rains that it's elects and I can also move the point exactly that I want so for example it shows me that this point here is the color that's going to be replaced with I confined tweak it exactly so you can do whole range of things with capture one on the color editor and you can go into advanced even it's like multiple ones you can say you know what the backdrop I think we're going to rotated to more of ah weren't on and do that way, and so it becomes very powerful nonsense. So that's basically in that regard let's go in to start exporting falls and working on them so I'm going to do is I'm going to go in and see right clicked export variants. I have an image name set my psst pro photo um three hundred bit here's where it says a bit and sixteen bit for the sake of speed, I'm not gonna hit sixteen right now because it does slow down your systems if you have a slow one, especially working allowed us to be very sketchy sometimes as your letters build, so for that sake, I'm just going to get a bit, but typically sixteen bit has benefits, especially if you're working a lot of radiance and transitions sixteen bit will have smoother gradations and transitions just like we saw when we were brushing white on black eight bits have a lot of levels that you can see sixteen bit is very smooth, and so what that means is if you have an image that you're going to do a lot of changes to a contrast and so forth, it's probably better to keep it in sixteen, however, the downside being that it does take a lot more space and also it does bog on your system as well. So I don't think you should always be sixteen bit I think it's a pro and con kind of thing just based on your input output whatever is you're doing uh and so forth let's see here so appear sti um keep it adobe rgb just for now just so it's pretty standard to what I typically do in my work flow for clients um I'll keep everything else the same and I'll hit export one variant this would be the equivalent of hoping foul on camera by just sitting open once you've set your color space and your death and so forth okay exports completed I'm gonna go in and closes out with command hq you close this window by command w and what happens is it closes your window you can double click on the background and opens up your last place that you open sort of going to file open so we have our selects here and exported out as a psd and here we have our beautiful image and if you notice I already see a difference in how the colors look just based on the fact that I'm working on a neutral backdrop more so you can even get more neutral than this um by right clicking on the background and hitting like gray and it's perfectly usual for example and then you could even hit f going to full screen if you feel like you don't want to see a female's except black now, let's say that I'm working in the first full screen view and what I want to do actually, before working is I'm going to essentially make a game plan for myself sometimes clients won't give me a game plan I felix it yesterday, which is fantastic, but in case you missed that, what essentially what happens is instead of zooming in at one hundred percent and I'm so glad we had this image to work on is because the beauty of this is that when every working on an image like this, you see, appears a sixty seven percent now this one hundred percent, you're going to see every single little detail, and this is what having detailed all about in a sense where you see a lot of information, sometimes you don't even see the information we print the images, but the main intention of this is that we don't want to start looking one hundred percent and working through the image because what's gonna happen is you're going to be so sidetracked. Bye retouching every little bit that you're going to spend hours when you start working, meeting from it files and follows that have higher megapixel range, you're going to spend forever, and you're never going to stop here that's going to default standard, and I want you to get away from that process and thinking and the reason I brought that up is what I want to tell you is that when you make a game plan for myself I start at around this level and I fix the things first that I see are wrong at this level I don't zoom in one hundred percent and circle everything that I see I start here I don't zoom in one hundred percent goal accordingly so what I would do mentally speaking I would do without ladas well is again the same thing as felix would do I would have a blank layer and I'll start circling things that come to mind and I'm going to sell clothes you can see my thinking okay uh the things that I know that I want to fix our these little hot spots here is in these dark lines here in this hot spots around the eyes and his little areas here um you obviously sees lines here to make this easier given color coded so you can say you know what this could mean dodge this is going to be burned or whatever the other thing is there these lines here that I probably to either eraser lytton um there's you know marks here that I want to take out that I see these are natural I only take them out if a client requests me to and that's interesting point in regards to what should be taken out what shouldn't be it's all relative to who you're working for what you believe in, she don't like freckles that's your problem? I I like freckles, I keep them, but typically clients will say priest taken out sometimes where they say keep them in I do according to order the demands are I will then continue going on and say, you know, I'm going to move these flyaways here, I'm not going to make it all completely straight I think the hairstyles fantastic except I don't want to go too crazy on them. I'll start taking on these little fires here. Um there's some dust pots in the background on dh I may enhance some of the dress details removed more flyers here and there's also some color issues on my screen. I typically sense that there's some green around the mouth area here there's a line here. Maybe I'll do some of the make up where I can even it out a little bit more, maybe at some acid in the eyes and even if the transition between the makeup because that's a huge thing when you see makeup, people expect it to be perfect. We thought the texture being messed up and then essentially continue going forward and making game plan I'm doing this not because I do it myself every day I do is because I do in my head and the reason why this is really important is if you don't have a game plan for yourself, you're going to spend extra hours more than you need, especially when you're spending hours already last year on a doozy carried away you wanna refocus yourself and just do the things that are important remember, you're not going to see all the things that are one hundred percent of the time, for example, did you know when I saw this image? I didn't know that let's see, there are these little hairs here I couldn't see every little individual hair if if we have pixel peepers here in the audience, they're going to be like priests every single little strand of hair I'm not going to do that because what happens is when you take other things that matter the most, and you keep the things that you don't really see when you finish everything diesel imperfections become things that add to the perfection they make it look like you never even retouch the image, it makes it look unbelievable, so people always ask me, how are you getting things so really it's so perfect that's part of the equation makes you not everything you deem a flaw flaws, and then you do see things whatever you see from the outside it's not what you see completely zoomed in okay, I do encourage to take out the things that you do see from outside for example what I mean by that is you have this little strands of hair is right however, not all of them are visible at this distance and this is really in depth you as well, but they're someone's that illuminated by the light that I'll be taking out but not everything you're gonna waste hours and is that really necessary has ever happened to you and you work in an image and you spent hours zoomed in working he's a lot again you gone before after there's nothing was like no difference and you realize you made a mess, right? I clean up on aisle five you made a huge mess and you don't you don't want to deal with that, right? You don't want to do in that situation where you're just doing that and the world of retouching time is money it's not about how many hours you spend it's about how much profit you make based on the hours you spent right a client is not going to pay you for sixteen hours of work if you know even if it's good, if he doesn't have a budget, the money is going to come from you know can you do the job and it is a project worth it for you, so the more time we spend I'm the last time you spend making image perfect the more turn around you get done in the past you could get to shooting so that's all principle behind it okay, so let's go ahead and start retouching uh it was like yes finally been retouched tomorrow no okay, you know at a higher risk though you did have I think a hair across the eye oh yeah the hair now definitely gone too I saw that in the my brother's drug yeah this hair was really knowing I'm going to take out these laws guys here and so these bits here oh and also these guys will be taken out there to, um this one cheek so basically the flower is that I see I won't okay here's what I'm not gonna be doing I'm not going to be going in saying let's make this perfect because this is not the hair saw that requires you to make it perfect pick your battles it's is not the tough hair style that is intended to be here so I didn't ask for it. The photographer didn't ask for it you shouldn't be doing it because if you do they're going to come back and say, what do you do? What did you do that wasn't my vision? Communicate with your photographer ask him whatever it is that you should be doing and then do it accordingly don't assume anything I need so many problems haven't had some problems assuming I never see you anymore if I don't know if that freckle should be there, I ask and I say you should be reciprocal or not and then you tell me accordingly. However, once you get to a building relationship as a retouched with your photographer, then it's okay to make these little distinctions it's surprising how many variables there are and how different photographer's work I've never met two photographers worked the exact same way, which is why I'm not giving out any rules on giving out options. That's why I say this all options and this isn't, you know, set in stone, okay, so I'm gonna go and start retouching and what I'm gonna do first is people are going to see you duplicate the background. No, I'm not I'm not going to look at the background, I'll tell you why first we're gonna make a folder and to make a folder is at the bottom of the layers panel, which is where there's a little a group grouper folder, same name are reading this alcott cleaning if I can spell so you can see here that that's the only thing I have there's a zoo cleaning folder um let's, see within the cleaning folder I'm going to take this new layer dialogue had the basically your shopping list of things that you're going to take care of but yet you threw it in the trash any reason why you wouldn't just hide it? S so that way you know, at the end of the day, you know when you're going to the check out you're done in a recent that you should actually keep it okay? The only reason why I threw the trash was because our dean you mentally for myself what I was going to do it was just to write out and showed curie guys what it is that I was going through my mind however that's a good question I'm glad you brought that up you typically keep it just so that later on you can go on double check and see wait a second I'm getting really distracted here I should be even touching the background right now and come back to it thank you little bit of ah question from james you hey regarding pixel peeping stuff what happens if you are retouching for a billboard or something huge at that point then don't you need to work on that level? I love that question and a lot because that's just know because how close are you to a billboard when you look at it it's a fair point and also do you know most billboards aren't even shot a meeting from the cameras I have done sweet billboards, they're shot with, like, five d mark one's, two threes just you can upsides them so large sometimes when you look at them close, they're very grainy in pixelated, so you never really know I mean, nowadays people send me fry falls, but before I remember, we'd have, like, you know, five d ones and they'll be billboards great, awesome, but yeah, I never really see them, but also this point is gonna make a lot of sense at the end when you see what exactly I'm talking about and then you see that well, I really didn't need to do that. I didn't need to go all the way right now, so the end you do have a redemption stage recon see uh, I should have done, then you can easily fix it because that point that's when things that you didn't do, who either stand out in a point where oh it's okay to keep or it'll stand out and say maybe we should remove it, but chances are you probably won't run through it once you see the energy. Fantastic. No, um, first thing we have is our folder, our new group, and within our clean folder I'm going to start with one blank layer, someone hit the layer new blank layer and it basically comes into your folder as long as your group is selected if you don't have it selected and you put a new layer what's going to happen is going to go over the background and not into the folder you know it's in the folder because it's subdivided inside it's tab if you will I don't know how else to describe it, but it's tab um now now this is where the magic starts happening we're gonna go and start healing um and cloning I will sometimes differentiated by having a hearing on one layer new bank there or cloning on blank layer so I'm going to do that just so you guys can see the difference typically I can do everything on this one language and be done because if I let's say I do sing on a blank clear let's say that in theory, let's, I do a ton of strokes and I want to undo something here I can manually undo this section here either a racing or masking and just remove it completely. For example, if I z racer not that I do, I want to show you is only this air gets removed or the rest of their still active so I don't have to use history states however, most of times I do mask what happens is if you had a mask which clips on the layer itself by clicking the mass button down here making sure that the mask is highlighted by clicking on it you can take a black brush and just hide away that one section so what that means is even though you did a step hundred steps ago as long as you know what you want to remove, you could just go on target right away it's much quicker than using history that's why I also don't use history so again let me go on doing this put a blank fresh layer straight oven on and then we're going toe basically go in and start healing everything on this layer okay? Now going first and foremost as I mentioned, I'm not going to start by going in all the way I'm going to start healing the areas that stand out to be the most first um you'll see a couple of principles that I do is I go forward the first and foremost being that I'm going to start by analyzing and taking in things that really stand up to me the most first and then later taking on the smaller details okay? I don't have a particular preference on where I start I'm not going to start say like, you know, on top of the face and work downwards or from bottom going up I'm just essentially starting on whatever sticks out to me first first second point is my brush size is exactly the same size as a blemish I'm removing it's not a gigantic brush like this and I'm not going to be taking a big chunks like that because what happens is it displaces texture call instantly you can always tell a person who does that because their skin transfer really blotchy when you're you mean cloning out stuff like that so it's very surgical actually I think I think retouching is a very surgical method I'm also going to take out any of these beauty spots just because even though it's optional typically no editorial said clients will ask me to continue remove it second ah thirty I make sure that my sample is close to the area that I'm moving so I'm not going to sample in a highlight if I'm removing a shadow area hey that's something that isa obvious because whenever you do that you tend to pick up a lot of color changes really quick and the way the healing brush works is that when you sample in area and then you pay sylvan area even though there may be a difference of lightness and luminosity the healing brush tends to account for those changes and recover the information so that I mean what I mean by that is say overheating a clothes brush here and my having colon breast elect clone brush selected and I am going to sample just like a wood by using alter our option I'm gonna sample the cheek and I'm going to start cloning on the shadow do you notice the shadow gets lighter that's because the clone brush is kind of dumb it doesn't really know the difference between ares it's just a copy and paste mechanism healing brush however you khun sample here and when you heal and let go it magically knows that need to compensate for lunacy is fantastic because it doesn't calculation and it's just cheese so that's why heating brush oyster comes first when you're doing flaws there was once appointed for shot there was no heating brush it was this cologne brush that was really terrible we would be here forever if we're doing that I apologise for anyone still using it for also very touching but I don't um the other thing is this is why I always change my brush size just based on the air that I'm working sometimes areas maybe too small or too big and I will target it just based on whatever size they are adjusting accordingly but again right now I'm just taking the air is a standard three the most I'm going in and quickly healing out those areas I know people are asking what about your brush hardness my brush hardness by right clicking is set to zero I think the person preference some people like it it one hundred just totally fine I like it a zero and I'll tell you why I think the transitions are much more realistic whenever you feel an object and what happens the area around it blends in better I don't think it disrupts texture because I brush is small however, if I use a bigger brush then it's a different story but I'm not going to so I don't really just my hardest I've also found when I just my hardest the results of blotchy for some reason maybe it's just a personal preference I've asked people I think fifty percent people said zero percent fifty percent of fifty percent said one hundred percent of the time thieves hardness one hundred percent hardness you can get a repetition that's, right? Yeah especially when your healing like this that's not what you look that strike you circuit is really just thoughts sometimes yeah that's actually right never thought about that thank you so pretty can I just jump and we are having a massive amount of people in the chat room asking about frequency separation when you use it when you use it I knew you were going to cover it at some point I just want to make sure to let everybody know it we've got that question don't worry he will talk about it it's funny that you ask because any time I do a workshop that is the first question I get, why don't you forget to separation that right now let me taste thing when you go to retouching house retouching agency they're going to kick you out the door for using that technique in the beginning no retouching house at the moment that I'm aware of that I have spoken with does that initially I do use it however the intent that I use it for is going to come later and you I'll show you a better way of using it because it's not going to africa bill now and I'm going to wait for that question because at that point I've been explained what frequent separation is why I don't use it in the beginning but what else I use it for later and why it makes sense use it later and not now okay great that they're getting it so how much of it out so, yeah, we had a good stopping point right now if you have any of the questions the audience we can address or weaken continued right after perfect we have any here in the room that you guys wanted teo get to at this point all right let's see if we've got maybe one or two good ones uh we don't have a lot of time let's see angel wasn't does the same thing applies to mass amounts of facial hair especially along the jaw line when a model has rather noticeable light hair and or dark hair along the jaw line do you follow the same steps that you just mentioned or is it necessary to remove the boss typical wolf all the same steps were first I'm zoomed out and I'm ruining the hairs stand out the most and the reason for that is whenever I complete my final retouch as you go forward you'll see exactly why do their process right now it's not going to make a lot of sense because you're going to see in theory that she may have a lot of hair on her arms on her face and it's very noticeable but going forward we do all evening steps that thing that became so obvious as you can come soul less obvious that you realise why it's not critical move it right now well a soldier self short on the beginning of this because the whole thing has been magical on I just wantedto also say I really appreciate how you're kind of setting a message out to the industry about howto network and be available and open and just good people yeah definitely the day we're all just people I mean there's nothing different about all of us set of personalities and uniqueness but then the day we're all just you know the same level playing field question from lenin glass from oh hey lyndon city friend yeah so how do you make sure that your cloning point doesn't repeat perfect so with a clone brush or even the heating brush um there is this little check box here this has aligned so say that I sample once on the skin and I don't sample again and start brushing what happens is that sample point kept moving with me we do it again for those that missed it I'm we're sampling once and no matter where I go it moves with me it moves in the same distance that I first sampled the benefit of this is that if you don't keep repeating and you want to fall along with you your quick aligned if you wanted to keep repeating because you found a really good source of skin on check align and what that does a few sample a good piece of skin you keep cloning or healing it stays in that point even if you've lifted up your brush and pasted it down again same thing with you hitting brush a lot of people asking about your use of smart objects yes do you what's your process what's your thought I wash becoming small objects tomorrow however haru that point being said is with more objects there's a very because the adjustment brushes there a c smart objects and replace the adjustment brush so what I would do is make a couple of exposures and stack them together with a small object and then brushed them in just based on whatever does whatever it is I was making there's a use for that them also going to cover so but it's much more minimal so I don't include that in my typical work for anymore love it all right, so guys, I know that we do have a ton of questions that are coming in a lot of them are things that again I know that we will be covering later, so if you don't hear me asking your question right now, that might be a reason for it we've got a full day and a half left with critiques, so there are lots of opportunities for those questions to come in on be answered already because you've been teaching this for a long time and you know, a lot of the questions that people are already going to ask, so you planet into your demonstration exactly. So I think the way that I designed this workshop was very similar to how I've learned over the years is that in every workshop you have exact same questions it's beautiful because I preemptively know that they're coming and I kind of make him wait just to get to the good parts and at the end of ah ha moment like ah that's how you do that that's why you're doing like this people feel this impatience, they have this order oh my god, that thing with an easy fix right now but when you go through the process you all make sense or stick around and don't go anywhere
Class Materials
bonus material with purchase
Ratings and Reviews
peter
Really wonderful course, thanks. May I suggest a fantastic idea for maybe those who purchase the course? It would be extremely useful to be provided with a summary of the content of each video segment, perhaps a 30-60 second video with written 'dot-point' sheet at the end of each segment, to be reviewed at a later time. It just takes too long to replay each video to get the important messages. The notes provided by Pratik were a step in the right direction but they need more detail of what was presented, including tips and tricks, in each segment. In this way, once having watched the entire course, you could go back and review the nitty-gritty aspects of each segment quickly and efficiently. These quick 'summary' clips could make up a separate 15 minute video, recapping in detail the hard-core content of the course, without interruptions from questions. This would be extremely useful and hopefully not take the presenter too long to film. I feel this would be a wonderful 'added value' aspect of buying the course, as it would not be available for for free viewing. It would certainly encourage me to buy more of the available courses. Keep up the great work at Creative Live! I have stopped my Kelby subscription and just watch you guys now!! Well done!! Peter Bourne Australia
Valentina
Pratik has been a revelation and a revolution at the same time, even kinda a benediction because of its huge generosity to show us such an efficient and powerful workflow. His genial approach turns impossible things into possible. What amazed me most, was Pratik ability to see further the shot and take the best of it to reach the perfection. The original photo is still there, very recognizable, but through a precise and meaningful workflow, it becomes eye-catching, high quality, high impact. Pratik is a wonderful person, very genuine, high talented, with a sophisticated sense of the aesthetics and arts. This course changed drastically my way to look at photoshop and at the retouching techniques. Thank you!!
user d3cdf7
I have been a retoucher since 1992 and a commercial photographer and I am amazed at the wealth of information Pratik is teaching us. Love his great sense of humor. Yes, retouching takes me way into the early part of the morning...up to 4 am. I've learned to listen to Books on DVD from the library which help my attitude much better. Several degrees behind me and I know I was meant to make a difference with portrait photography. NO ONE wants reality, especially at elder ages. So I continue to learn to retouch professionally and not use a quick retouch filter which renders a fake look. I may incorporate a light retouching filter, but I find I must always do some manual retouching first, in order to have the appearance look real. Which is the old first rule to retouching itself. In the film days, I use to make my own texture screens in order to create more beautiful faces. My photographer friends would ask for my help in using them, when they had blurred an important celebrity shot. The texture screen would help spread the dots and give the appearance of your digital noise now. The results were the image looked more focused Thank you Pratik Naik, for being so generous with your techniques. I am interested in how to price out retouching jobs, as I have been told I give my retouching away with my photography. Thanks,, Jeri Goodwin-Akari cherished moments photography in walla walla, WA
Student Work
Related Classes
Portrait Photography