Building Visual Pocket Layouts
Lesson 19 from: Design Digital Scrapbook Layouts in PhotoshopTraci Reed
Building Visual Pocket Layouts
Lesson 19 from: Design Digital Scrapbook Layouts in PhotoshopTraci Reed
Lesson Info
19. Building Visual Pocket Layouts
Lessons
Free Preview: Organizing Your Photos for Digital Scrapbooking
10:00 2Including Videos in Your Digital Scrapbook
02:59 3Organizing Your Digital Scrapbooking Layouts
05:07 4Organizing Your Supplies
12:32 5Organizing Your Templates
06:58 6Batch Processing Photos for Digital Scrapbooking
09:58 7Adding Photos to Scrapbooking Templates
08:51 8Adding Embellishments to Scrapbooking Templates
10:29Adding Alphabets to Scrapbooking Templates
08:48 10Making the Digital Template Your Own
13:57 11Building Layouts by Scraplifting
14:08 12Building Depth with Scrapbooking Embellishments
10:27 13How to Make Blended Scrapbooking Layouts
08:05 14Create Balance with Clusters
07:24 15Scrapbooking with Multi Photo Digital Scrapbook Layouts
06:12 16Making a Block Layout
16:50 17Organizing Your Digital Pocket Scrapbooks
07:04 18Create a Digital Pocket Scrapbook Canvas
09:16 19Building Visual Pocket Layouts
12:46 20Embellishing Each of Your Scrapbook Pockets
12:04 21Building Titles & Journaling on Pockets
15:23 22Merging Pockets to Print Scrapbook Pages
06:13 23Creating Hybrid Scrapbooking Pages and Books
08:02Lesson Info
Building Visual Pocket Layouts
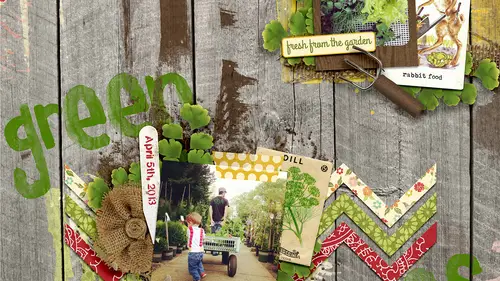
Let's start with the three by fours and I'm going tio let's do the one next to fin so that is going to be the son and sin had a funny little quote when he was burying himself in the sand so I'm going tio put that over here and I'm just going to delete this place holder altogether and now I can put his little quote in the quote level and this is a really good great way when your pocket scrapbooking to fill up all of the pockets when you don't necessarily have a story or a photo to fill up the pocket so I don't have photos for every pocket so we're going to also dio this one over here on the end and we're going to eat its place holder and I want one here now you'll notice that the way that I'm designing the whole layout is that you kind of I'm kind of alternating photo there's a new photo here journaling card photo journaling card photo journaling card and that's a away to create repetition in your pocket scrapbooking pages too because you're looking at such a large canvas um the things ...
that when you convey build visual balance like that across the whole page you're going to give your readers or your viewer something to kind of you know you march across the page with these pocket cars and it creates the pops of color all the way across hey and I'm going to delete this place holder and now I can start adding the photos in that aren't going to take up the whole page are all the whole pocket so what I always end up doing is I will re side them down so that they fit the pocket size and I'm just gonna haphazardly in to begin with place them in the pockets that I think I want them to go in so I'm gonna put another photo here this goofy photo my husband and I are nerds and I like to make sure that I document that we're nerds in our scrapbook so we can really torture our kids later bust out the scrapbooks for their dates look at this picture of us playing in the car okay so haphazardly put that won the because now I want to make sure that I see my whole layout coming together before I really start playing with we're inputting embellishments and where I am building little mini layouts my dog hates the water she absolutely loves it it terrifies her and we knew that she didn't like babs we did not know that she didn't like the beach until we were there so we had to include that story in this layout this one down the corner hopes I put it underneath the pocket so we're just going to move it up until it's on top of the pocket it's okay if it comes out if it doesn't completely fit into the pocket because I'm going to crop he's so just make sure that it's the dimensions that you know that you want it to be after it's cropped then I have one more pocket or no have this pocket and then I have one more afterwards see, this is why you always like the pocket first learn from my mistakes here you okay? I want more pocket that actually is going to have two pictures on it kids out in the water my husband has a go pro and took it out in the water so these were the neatest pictures of them out in the water. So obviously this trip is are this pocket pages about our surfing trip over the summer? So it's not a weekly documentation I didn't fit the whole weekend it's just a different way for me to include a ton of pictures that's the wrong photo a ton of pictures into one spread and have it make sense this is the right photo okay, so we have our photo placement. We have everything ready to go on but I'm not going to tackle this one yet because this is going to be my title my title pocket so let's look at these pictures what I like to do for my pocket scrapbooking as I like them all to have a white border around them I think it helps to keep make them stand out in the pocket so I'm at a ten point white stroke to the photo and this is a lot of extra space up here, so I'm gonna crop out I'm sure you don't have it on fixed ratio I'm gonna crop out the very top of this so I don't have to rast arise it and delete the very top and now I can take I'm not a shadow as well and then I can copy this layer style and I'm going to go in and I'm going to apply it to every single photo that is not going to take up an entire pocket pace layer style, okay, now this doesn't fit, but I don't really want his whole entire arm over here, so I'm going to act we got this one as well let's to about here and I'm gonna cross this edge off a swell and I'm I can create a new layer from my selection and it will also replicate the layer style so I don't have to worry about that and let's call it a couple more. So now I have all of these photos. I have all of these photos on these empty pockets, but I'm not going tio worry about using like the digital kits and all that stuff to build the most of these pockets I'm actually going to use journaling cards too use I'm going to use them as the background of most of these pockets, so let me crop this one last photo I want to be a nice tight crop command j to create a new layer from your selection. Ok, now I'm going to start dragging in the journaling cards that I'm going to use, so make sure that you click on the actual pocket template so that you can go behind your photos and you don't have tio you don't have to find them in the layer order again, and I'm going to start dragging in some cards let's do this one. I really like the triangles on these cards. The middle is going to get covered up, so we're just going to be able to see the triangles and I'm going to crop this down for just us. And, you know, once I have all of my journaling cards situated, then after that is when I start adding embellishments I'd like to get I like to work in a process with my entire pocket scrapbooking lay out just like I do with a twelve by twelve lay out um I like to start with the papers on the photos in this case the paper, the papers would be the journaling cards and build from the bottom up the beauty of pocket scrapbooking is that all of this work is done for you. You didn't see I'm literally just dragging in journaling cards and all and they have designs and all of this is ready made for you so add your own stuff tio or to just leave the way that it is it depends on how you like to pocket scrapbook maybe you're a lot simpler of a pocket scrap weaker than I am, which is perfectly ok ok, so that is all the journaling cards when we use so but you don't have to be relegated to just using journaling cards you can also use any of your digital scrapbooking products to create pockets scrapbooking lay out so I'm going to use some papers and embellishments as well papers and behind this card I think I'm going to go gray we have a lot of color coming in on this layout because it's such a bright and busy kit someone is just use a gray over here and then let's use we're gonna I want to balance the black that's over here so I mean he is a black pattern over here as well make sure you clip your papers to your pockets and then this looks pretty boring to me so let's add to it I'm going to add some visual interest with some more pattern in the background but I'm not in the background so let's move down I remember that trick I showed you earlier where you can select one layer and the layer where you actually want that layer to be and you can hit command and the left bracket and it will go down well, now we want to bring it back up again to where it was supposed to be, but they're both underneath the photo now and we can clip the papers to the pocket again. Ok? And one more, this is going to be my title card, so I'm going to actually build the title on this card is gonna have no photos, but I wanted to have some nice paper layering going on, so I'm going tio build up the papers in the background before I add the titles. Now if when you're working with pockets, if the pattern is too big for you just like on the layout, you can reduce the pattern size and make it work for your pocket, and this is pretty boring to me too, but instead of drawing are bringing just paper and clipping it the way I have been the other ones I'm going to make sure I click in the background and I'm going to draw a paper strip back here because I don't want it to go all the way to the bottom, so the key is when you're doing this because you cannot clip both the paper strip and the paper that's clipped to the paper's trip to the pocket I'll show you why you have to make sure that you get a six inch across paper strips so that its exact same sizes the pocket. So I'm going to six inch by one inch, and then I'm going to align it perfectly to the pocket. Maybe just a little bit underneath the photo. And now, if I were to clip the paper strip and then come in here and try and clip a paper to the paper, strip me, rotate this because I want vertical stripes, not horizontal. Make a little smaller, ok, snow. If I were to try and clip the paper to just the paper ship when the paper ship is already clipped to the pocket, it's just going to clip it to the entire pocket. So, that's, why it's important to make sure that the paper ship itself is six inches and centered directly over the pocket? Now I'm gonna unclip it, and I'll clip just the paper instead.
Class Materials
bonus material with purchase
Ratings and Reviews
a Creativelive Student
Great series of classes! For anyone from beginner to advanced Photoshop user, you will get something from these classes! Traci is a great teacher and easy to understand why she works the way she does. I would highly recommend these classes to anyone wanting to learn tips and tricks from a great scrapbook designer!
Krista
I'm currently halfway through the courses, and I am so glad I decided to watch these. I haven't been scrapping for very long, and am mostly self taught through tutorials found on the internet and youtube. I found that various concepts weren't explained to me (how to really use a template, designer intentions, how to use other layouts for inspiration) and so I sort of hit a wall trying to get further in scrapping digitally. This course basically broke down the walls and provided me with so much info and inspiration that I feel really comfortable in taking my efforts further. Whereas before I was thinking that I might always be stuck with a mediocre result :) thank you Traci!!